I am sorry that I do not have a photo for this recipe. It got gobbled up before I had a chance to take a photo (always a good sign), but with zucchinis in abundance right now, I had to share this deliciously moist loaf cake. Cake or Bread? It is somewhere in between the two, but regardless, it is a perfect choice for a late summer rustic dessert, afternoon snack or breakfast treat. I am guessing these would also bake up as wonderful little cupcakes... perhaps with a dollop of cream cheese frosting?
Zucchini Bread with Craisins and Dark Chocolate Chips
Tart craisins, sweet zucchini bread and dark chocolate – a perfect combination. The whole wheat pastry flour and spelt flour can be substituted for whole wheat flour and all purpose flour, if you like.
Makes 1 loaf
1 cups whole wheat pastry flour
1 cup spelt flour
1/2 teaspoons baking powder
1 teaspoon baking soda
3 teaspoons ground cinnamon
1/4 teaspoon freshly grated nutmeg
1/4 teaspoon salt
2 eggs
3/4 cup packed brown sugar
3/4 cup granulated sugar
1 cup canola oil
1 teaspoon vanilla extract
10 ounces grated zucchini
2/3 cup craisins
2/3 cup dark chocolate chips
Preheat the oven to 350 degrees F. Grease a 9 by 5 loaf pan with canola oil and line the bottom with parchment paper.
In a medium size bowl, combine the flours, baking soda, baking powder, cinnamon, nutmeg and salt. Set aside.
In another bowl combine the eggs and sugars with a whisk until well combined. Stir in the oil, vanilla extract and grated zucchini until well combined. Gently stir in the dry ingredients and the craisins and chocolate chips.
Pour the batter into the prepared loaf pan and bake for approximately 60 minutes, or until the top is golden brown and a toothpick inserted into the center of the bread comes out clean. Let the bread cool in the pan for 10 minutes; then transfer to a wire rack to cool completely. This bread will keep wrapped tightly in plastic wrap for up to 3 days.
Showing posts with label cake. Show all posts
Showing posts with label cake. Show all posts
Tuesday, August 31, 2010

Sunday, August 15, 2010
Coconut Cupcakes

Coconut Cupcakes with Coconut Butter Cream,
White Chocolate Shavings and Raspberries
These cupcakes are moist and light, yet slightly dense. Their texture is paradoxically somewhere between a pound cake and an angel food cake. I guess this makes sense when you realize that these cupcakes are in fact, fat free angel food cakes with the addition of full fat coconut milk. The coconut flavor here is subtle, very subtle, because of the use of real coconut milk and not the artificial extract that tastes like tropical tanning oil. I decorate these cupcakes with white chocolate shavings and a raspberry for an elegant touch, but also as a wonderful compliment of flavors. Certainly this recipe could also be made as a fabulous layer cake.
Makes 24-26 cupcakes or 1 nine inch layer cake
3 cups cake flour
1 teaspoon baking powder
1 1/2 cups sugar
8 egg whites
1/4 teaspoon salt
14 ounces unsweetened whole fat coconut milk
1/2 teaspoon almond extract
1/2 cup unsalted butter, room temperature
1 teaspoon vanilla bean paste or vanilla extract
3 ounces coconut milk
20 ounce powdered sugar, sifted
1 bar good quality white chocolate
14 fresh raspberries, cut in half
Preheat the oven to 350 degrees F. Line 24-26 standard size muffin tins with paper liners.
Over a medium size bowl, sift together the flour, baking powder and sugar. Set aside.
Place the egg whites and salt in bowl fitted for an electric mixer with the whisk attachment. Whisk on high speed until stiff peaks form.
Pour the coconut milk and almond extract into the dry ingredients and mix together with a wooden spoon or spatula until incorporated. (Do not over mix.) Gently fold in 1/3 of the egg whites, until just incorporated. Fold in the next 1/3 until just incorporated, and finally fold in the last third without deflating the egg whites. Immediately scoop the batter into the prepared cups, filling each three-quarters full. Bake until cooked through, about 15-17 minutes. To tell if the cake is baked through, press your finger gently on the center of the cake – it should bounce back and not seem raw and gooey, or insert a cake tester inserted into the center of the cake; it should come out clean. Transfer the tins to wire racks and let cool for 1 minute. Carefully remove the warm cupcakes to a wire rack to cool completely.
To make the frosting, cream together the butter, vanilla extract and half of the powdered sugar and half of the coconut milk on medium/high speed until smooth and creamy. Add the remaining powdered sugar and coconut milk and mix until glossy and smooth. Use an off set spatula to frost each cupcake with the frosting, about 2 tablespoons.
To shave the white chocolate, place the bar on a chopping block. Run the blade of a sharp knife downward alongside the chocolate to create chocolate curls or shavings. Top each cupcake with a sprinkling of white chocolate and a raspberry half. Cupcakes are best eaten the same day they are made but will keep in the refrigerator for up to 3 days.

Sunday, August 1, 2010
Celebrating Chocolate Cakes
Quite a few weeks back I spent most of an entire weekend baking celebration chocolate cakes. On Saturday a German Chocolate Cake for a graduation and on Sunday a Double Chocolate Layer Cake for Father's Day. These cake are variations of each other - one milk and one dark, yet with starkly different frostings. Both are wonderful recipes for whatever your celebration.

Milk Chocolate Cake with Coconut Pecan Frosting
This cake, also known as, German Chocolate Cake, is an American favorite (not a German one) whose name originated from its use of Baker’s German Sweet Chocolate in the recipe. What makes a German chocolate cake not a chocolate cake with a coconut pecan frosting, is the use of milk chocolate in its cake layers, and not semisweet or dark. When I walk into a bakery or cake shop and see layers of dark chocolate or devil’s food cake instead of milk chocolate in their “German Chocolate Cake,” it’s like nails against a chalkboard. It actually upsets me.
But when made correctly, moist milk chocolate cake layered between rich coconut pecan frosting is quite heavenly. I have been working on and looking for a good German Chocolate Cake for quite sometime now, and I have happily created a perfectly flavorful and tender milk chocolate cake to be layered between an adapted version of my Grandma’s recipe for Coconut Pecan Frosting. This recipe is scaled for a half sheet cake, which is perfect for serving a large crowd, but isn’t quite as attractive. See the cooking note below to alternatively make a 9 inch layer cake. Whatever size, a slice of this cake is the perfect choice to make any celebration a memorable one.


Makes 1 half sheet cake
Ingredients
Cake
3 cups all purpose flour
scant 1/2 cup cocoa powder (Green and Black’s)
2 teaspoons baking soda
1/2 teaspoon salt
12 oz. (3 sticks) unsalted butter, at room temperature
2 1/4 cups granulated sugar
6 eggs
6 ounces milk chocolate, chopped
1 tablespoon vanilla extract
1 1/2 cups buttermilk
Frosting
12 oz. (1 can) evaporated milk
6 ounces (1 1/2 sticks) unsalted butter
1 1/2 cups granulated sugar
pinch of salt
1 teaspoon vanilla
4 eggs
14 oz (1 package) sweetened flaked coconut
1 1/2 cups pecans, slightly toasted, chopped
Preheat the oven to 350 degrees F. Butter two half-sheet pans, and line the bottom of each with parchment paper. Set aside.
In a medium size bowl, sift together the flour, cocoa powder, baking soda and salt. Set aside.
Using a double boiler, or carefully using the microwave, melt the milk chocolate in a medium bowl. Set aside and let cool.
In a medium bowl fitted for an electric mixer, cream together the butter and sugar on medium/high speed until pale and fluffy. Add the eggs, one at a time, beating until each is incorporated, scraping down the sides of bowl as needed. Reduce the speed to low and add the melted chocolate and the vanilla extract. Add the flour mixture in two batches, alternating with the buttermilk; beating until combined after each addition.
Divide the batter evenly among the cake pans. Bake the cakes until a cake tester inserted in centers comes out clean, about 25 minutes. Do not over bake. Transfer the cake pans to wire racks and let cool.
Meanwhile, make the frosting. Heat the milk, butter and half of the sugar in a medium saucepan until almost simmering. Reduce the heat to low and add the vanilla and the salt. In a separate bowl combine the remaining sugar and the eggs. Whisk together well. (Do not allow the eggs and sugar to sit without being stirred, otherwise the sugar will cook the eggs.) Temper the egg mixture into the milk mixture. To do this, whisk the egg mixture and at the same time, pour a small amount (about 1/2 cup, 1 tablespoon at a time) of the hot milk mixture into the eggs. Then, return the pan with the remaining milk back to the stove. Whisk the warm milk, while slowly pouring the egg mixture into the warm milk. Cook the frosting over medium/low heat, while stirring, until thick, like a custard, about 10 minutes. Immediately pour the frosting through a sieve into a clean bowl. Stir in the coconut and the pecans. Set aside and let cool completely.
To assemble the cake, place one layer of the cake on a large plate or clean piece of cardboard wrapped in foil or paper. Remove the parchment paper. Spread half of the frosting evenly on the cake using an offset spatula. Carefully invert the second cake on top of the first. Frost with the remaining frosting. (You may also choose to frost the sides of this cake with chocolate ganache.) This cake is best, eaten the day it is made, but will keep up to 3 days in the refrigerator.
Cooking Note: To make a 9 inch cake, use 2 cups flour, 1/4 cup cocoa powder, 1 1/2 teaspoon baking soda, 1/4 teaspoon salt, 8 oz (2 sticks) unsalted butter, 1 1/2 sugar, 4 eggs, 4 oz chocolate, 1 1/2 teaspoons vanilla extract, 1 cup buttermilk for the cake and make in the exact same manner, but adjusting the cooking time to 20-25 minutes. However, the frosting does not need to be scaled down. Make the full recipe as follows and frost the sides of the cake if desired.
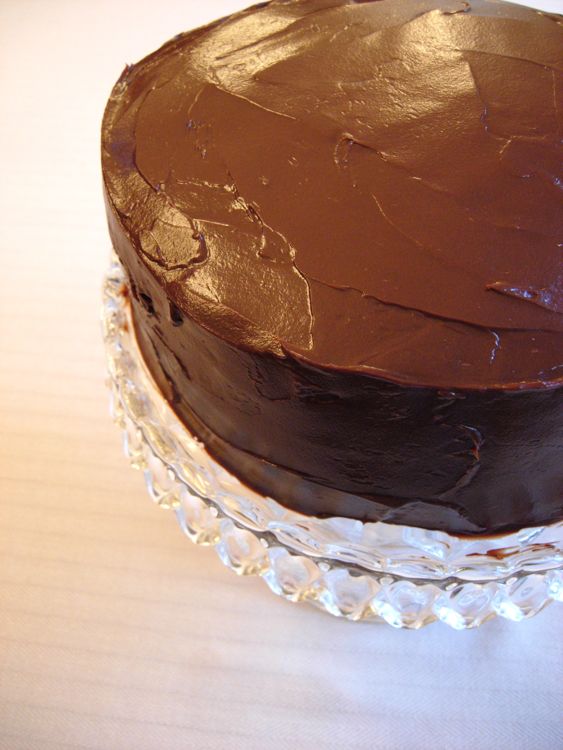
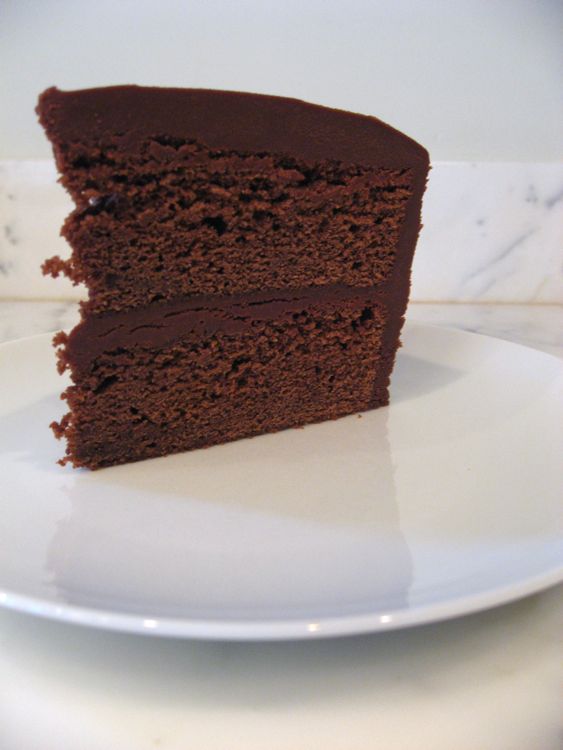
Double Chocolate Layer Cake with Rich Chocolate Frosting
Your classic chocolate cake.


Serves 12
Ingredients
Cake
2 cups all purpose flour
1/4 cup cocoa powder (Green and Black’s)
1 teaspoon baking soda
1 teaspoon salt
3 oz. dark chocolate (70%), chopped
1 oz. milk chocolate, chopped
1 cup (2 sticks) unsalted butter, room temperature
1 1/2 cups granulated sugar
4 eggs
1 teaspoon vanilla extract
1 cup buttermilk
Frosting
2 cups heavy cream
1 cup confectioner’s sugar
pinch of salt
1 1b. dark chocolate (65%), chopped
1 teaspoon vanilla extract
Preheat the oven to 350 degrees F. Butter two 9 inch cake pans. Line the bottom of each cake pan with parchment paper. Set aside.
In a medium size bowl, sift together the flour, cocoa powder, baking soda and salt. Set aside.
Using a double boiler, or carefully using the microwave, melt the dark and milk chocolate in a medium bowl. Set aside and let cool.
In a medium bowl fitted for an electric mixer, cream together the butter and sugar on medium/high speed until pale and fluffy. Add the eggs, one at a time, beating until each is incorporated, scraping down the sides of bowl as needed. Reduce the speed to low and add the melted chocolate and the vanilla extract. Add the flour mixture in two batches, alternating with the buttermilk; beating until combined after each addition.
Divide the batter evenly among the cake pans. Bake the cakes until a cake tester inserted in centers comes out clean, about 20-25 minutes. Transfer the cake pans to wire racks and let cool for 10 minutes. Carefully run a knife alongside the edges of the cake and the pan; then invert the cake onto a flat plate. Remove the parchment paper. Invert the cake back onto a wire rack to cool completely.
To make the frosting, heat the sugar and milk in a medium saucepan and bring to a simmer. Turn off the heat and add the salt, chocolate and vanilla extract. Let stand 1 minute, then stir until combined and smooth. Let the frosting cool 1-2 hours, stirring occasionally, until thick enough to frost the cake.
To assemble the cake, place one layer of the cake on a large cake plate or pedestal. Put about 2/3 cup frosting on the cake and use an offset spatula to evenly distribute the frosting. Place the second cake layer on top and use the remaining frosting on the top and sides of the cake. This cake is best, eaten the day it is made, when the cake is tender and light and the frosting is smooth and soft. Refrigerating the cake will cause the frosting to turn harder, more like the center of a truffle, which is also delicious, but entirely different.


Milk Chocolate Cake with Coconut Pecan Frosting
This cake, also known as, German Chocolate Cake, is an American favorite (not a German one) whose name originated from its use of Baker’s German Sweet Chocolate in the recipe. What makes a German chocolate cake not a chocolate cake with a coconut pecan frosting, is the use of milk chocolate in its cake layers, and not semisweet or dark. When I walk into a bakery or cake shop and see layers of dark chocolate or devil’s food cake instead of milk chocolate in their “German Chocolate Cake,” it’s like nails against a chalkboard. It actually upsets me.
But when made correctly, moist milk chocolate cake layered between rich coconut pecan frosting is quite heavenly. I have been working on and looking for a good German Chocolate Cake for quite sometime now, and I have happily created a perfectly flavorful and tender milk chocolate cake to be layered between an adapted version of my Grandma’s recipe for Coconut Pecan Frosting. This recipe is scaled for a half sheet cake, which is perfect for serving a large crowd, but isn’t quite as attractive. See the cooking note below to alternatively make a 9 inch layer cake. Whatever size, a slice of this cake is the perfect choice to make any celebration a memorable one.


Makes 1 half sheet cake
Ingredients
Cake
3 cups all purpose flour
scant 1/2 cup cocoa powder (Green and Black’s)
2 teaspoons baking soda
1/2 teaspoon salt
12 oz. (3 sticks) unsalted butter, at room temperature
2 1/4 cups granulated sugar
6 eggs
6 ounces milk chocolate, chopped
1 tablespoon vanilla extract
1 1/2 cups buttermilk
Frosting
12 oz. (1 can) evaporated milk
6 ounces (1 1/2 sticks) unsalted butter
1 1/2 cups granulated sugar
pinch of salt
1 teaspoon vanilla
4 eggs
14 oz (1 package) sweetened flaked coconut
1 1/2 cups pecans, slightly toasted, chopped
Preheat the oven to 350 degrees F. Butter two half-sheet pans, and line the bottom of each with parchment paper. Set aside.
In a medium size bowl, sift together the flour, cocoa powder, baking soda and salt. Set aside.
Using a double boiler, or carefully using the microwave, melt the milk chocolate in a medium bowl. Set aside and let cool.
In a medium bowl fitted for an electric mixer, cream together the butter and sugar on medium/high speed until pale and fluffy. Add the eggs, one at a time, beating until each is incorporated, scraping down the sides of bowl as needed. Reduce the speed to low and add the melted chocolate and the vanilla extract. Add the flour mixture in two batches, alternating with the buttermilk; beating until combined after each addition.
Divide the batter evenly among the cake pans. Bake the cakes until a cake tester inserted in centers comes out clean, about 25 minutes. Do not over bake. Transfer the cake pans to wire racks and let cool.
Meanwhile, make the frosting. Heat the milk, butter and half of the sugar in a medium saucepan until almost simmering. Reduce the heat to low and add the vanilla and the salt. In a separate bowl combine the remaining sugar and the eggs. Whisk together well. (Do not allow the eggs and sugar to sit without being stirred, otherwise the sugar will cook the eggs.) Temper the egg mixture into the milk mixture. To do this, whisk the egg mixture and at the same time, pour a small amount (about 1/2 cup, 1 tablespoon at a time) of the hot milk mixture into the eggs. Then, return the pan with the remaining milk back to the stove. Whisk the warm milk, while slowly pouring the egg mixture into the warm milk. Cook the frosting over medium/low heat, while stirring, until thick, like a custard, about 10 minutes. Immediately pour the frosting through a sieve into a clean bowl. Stir in the coconut and the pecans. Set aside and let cool completely.
To assemble the cake, place one layer of the cake on a large plate or clean piece of cardboard wrapped in foil or paper. Remove the parchment paper. Spread half of the frosting evenly on the cake using an offset spatula. Carefully invert the second cake on top of the first. Frost with the remaining frosting. (You may also choose to frost the sides of this cake with chocolate ganache.) This cake is best, eaten the day it is made, but will keep up to 3 days in the refrigerator.
Cooking Note: To make a 9 inch cake, use 2 cups flour, 1/4 cup cocoa powder, 1 1/2 teaspoon baking soda, 1/4 teaspoon salt, 8 oz (2 sticks) unsalted butter, 1 1/2 sugar, 4 eggs, 4 oz chocolate, 1 1/2 teaspoons vanilla extract, 1 cup buttermilk for the cake and make in the exact same manner, but adjusting the cooking time to 20-25 minutes. However, the frosting does not need to be scaled down. Make the full recipe as follows and frost the sides of the cake if desired.
Double Chocolate Layer Cake with Rich Chocolate Frosting
Your classic chocolate cake.
Serves 12
Ingredients
Cake
2 cups all purpose flour
1/4 cup cocoa powder (Green and Black’s)
1 teaspoon baking soda
1 teaspoon salt
3 oz. dark chocolate (70%), chopped
1 oz. milk chocolate, chopped
1 cup (2 sticks) unsalted butter, room temperature
1 1/2 cups granulated sugar
4 eggs
1 teaspoon vanilla extract
1 cup buttermilk
Frosting
2 cups heavy cream
1 cup confectioner’s sugar
pinch of salt
1 1b. dark chocolate (65%), chopped
1 teaspoon vanilla extract
Preheat the oven to 350 degrees F. Butter two 9 inch cake pans. Line the bottom of each cake pan with parchment paper. Set aside.
In a medium size bowl, sift together the flour, cocoa powder, baking soda and salt. Set aside.
Using a double boiler, or carefully using the microwave, melt the dark and milk chocolate in a medium bowl. Set aside and let cool.
In a medium bowl fitted for an electric mixer, cream together the butter and sugar on medium/high speed until pale and fluffy. Add the eggs, one at a time, beating until each is incorporated, scraping down the sides of bowl as needed. Reduce the speed to low and add the melted chocolate and the vanilla extract. Add the flour mixture in two batches, alternating with the buttermilk; beating until combined after each addition.
Divide the batter evenly among the cake pans. Bake the cakes until a cake tester inserted in centers comes out clean, about 20-25 minutes. Transfer the cake pans to wire racks and let cool for 10 minutes. Carefully run a knife alongside the edges of the cake and the pan; then invert the cake onto a flat plate. Remove the parchment paper. Invert the cake back onto a wire rack to cool completely.
To make the frosting, heat the sugar and milk in a medium saucepan and bring to a simmer. Turn off the heat and add the salt, chocolate and vanilla extract. Let stand 1 minute, then stir until combined and smooth. Let the frosting cool 1-2 hours, stirring occasionally, until thick enough to frost the cake.
To assemble the cake, place one layer of the cake on a large cake plate or pedestal. Put about 2/3 cup frosting on the cake and use an offset spatula to evenly distribute the frosting. Place the second cake layer on top and use the remaining frosting on the top and sides of the cake. This cake is best, eaten the day it is made, when the cake is tender and light and the frosting is smooth and soft. Refrigerating the cake will cause the frosting to turn harder, more like the center of a truffle, which is also delicious, but entirely different.

Saturday, May 8, 2010
For Mom
Damp Lemon Yogurt Loaf Cake
This moist lemon cake is a perfect gift to give Mom for Mother's Day.


Damp Lemon Yogurt Loaf Cake
Makes 2 cakes
Ingredients
- 3 cups flour
- 1 teaspoon baking soda
- 1 teaspoon baking powder
- 1/2 teaspoon salt
- 1 cup unsalted butter, at room temperature
- 2 1/3 cups sugar
- 1/4 cup lemon zest
- 5 eggs
- 1 teaspoon vanilla extract
- 1 cup plain yogurt
- 3/4 cup freshly squeezed lemon juice
Preheat the oven to 350 degrees F. Grease two 8 ½ by 4 ¼ by 2 ½ inch loaf pans and line the bottom with parchment paper. Set aside.
In a medium size bowl sift together the flour, baking soda, baking powder and salt and set aside.
In a large bowl fitted for an electric mixer cream together the butter and sugar until light and fluffy, about 5 minutes. Add the lemon zest and vanilla. Add the eggs one at a time, mixing together after each addition.
Gently stir in a third of the flour mixture until just combined. Add the yogurt and stir together. Add another third of the flour mixture and gently stir until combined. Stir in the lemon juice and finally, stir in the remaining third of the flour mixture until all of the ingredients are fully incorporated. Divide the cake batter evenly among the loaf pans and bake for 50-60 minutes or until a cake tester inserted into the middle of the cake comes out clean. Allow the cakes to cool for 20 minutes in their pans, then transfer to a wire rack to cool completely. This cake will keep in an airtight container or wrapped in plastic wrap for up to 3 days.
This moist lemon cake is a perfect gift to give Mom for Mother's Day.


Damp Lemon Yogurt Loaf Cake
Makes 2 cakes
Ingredients
- 3 cups flour
- 1 teaspoon baking soda
- 1 teaspoon baking powder
- 1/2 teaspoon salt
- 1 cup unsalted butter, at room temperature
- 2 1/3 cups sugar
- 1/4 cup lemon zest
- 5 eggs
- 1 teaspoon vanilla extract
- 1 cup plain yogurt
- 3/4 cup freshly squeezed lemon juice
Preheat the oven to 350 degrees F. Grease two 8 ½ by 4 ¼ by 2 ½ inch loaf pans and line the bottom with parchment paper. Set aside.
In a medium size bowl sift together the flour, baking soda, baking powder and salt and set aside.
In a large bowl fitted for an electric mixer cream together the butter and sugar until light and fluffy, about 5 minutes. Add the lemon zest and vanilla. Add the eggs one at a time, mixing together after each addition.
Gently stir in a third of the flour mixture until just combined. Add the yogurt and stir together. Add another third of the flour mixture and gently stir until combined. Stir in the lemon juice and finally, stir in the remaining third of the flour mixture until all of the ingredients are fully incorporated. Divide the cake batter evenly among the loaf pans and bake for 50-60 minutes or until a cake tester inserted into the middle of the cake comes out clean. Allow the cakes to cool for 20 minutes in their pans, then transfer to a wire rack to cool completely. This cake will keep in an airtight container or wrapped in plastic wrap for up to 3 days.
Tuesday, April 6, 2010
Hummingbird Cake

Hummingbird Layer Cake with Cream Cheese Frosting
A perfectly Spring dessert - Hummingbird Cake is a Southern dessert that earned its name because it is as sweet as the nectar that attracts hummingbirds. This moist layer cake is sweetened with banana, pineapple and coconut and is studded with toasted pecans. Cream cheese frosting has the perfect balance of tartness to balance out the sweetness of this cake.

Serves 12
Ingredients
Cake
- 3 cups all purpose flour
- 1 teaspoon baking soda
- 1/4 teaspoon salt
- 1/2 teaspoons ground cinnamon
- 3/4 cup canola oil, plus more for greasing the pans
- 1 1/2 teaspoons vanilla extract
- 2 cups granulated sugar
- 3 eggs
- 3 cups mashed ripe banana (about 3)
- 8 ounces crushed pineapple
- 3/4 cup pecans, roughly chopped and toasted
- 1 cup desiccated unsweetened coconut
Frosting
- 8 ounces cream cheese, room temperature
- 6 tablespoons unsalted butter, room temperature
- 14 ounces powdered sugar
- 1 teaspoon vanilla extract
Preheat the oven to 350 degrees F. Grease two 9 inch cake pans. Line the bottom of each cake pan with parchment paper. Set aside.
In a medium size bowl, sift together the flour, baking soda salt, and cinnamon.
Place the oil, vanilla extract and sugar in a medium size bowl fitted for an electric mixer. Mix together on medium/high speed until combined. Add the eggs, one at a time, beating until each is incorporated, scraping down the sides of bowl as needed. Beat on medium/high speed for 3 minutes or until light and fluffy. Reduce the speed to low and add the banana, pineapple and coconut. Add the flour mixture and mix until just combined. Finally, fold in the toasted pecans.
Divide the batter evenly among the cake pans. Bake the cakes until a cake tester inserted in centers comes out clean, about 35-40 minutes. Transfer the cake pans to wire racks and let cool for 15 minutes. Carefully run a knife alongside the edges of the cake and the pan; then invert the cake onto a flat plate. Remove the parchment paper. Invert the cake back onto a wire rack to cool completely. The cakes can be made 1 day ahead of time, and individually wrapped in plastic before frosting.
To make the frosting, cream together the cream cheese, butter, powder sugar and vanilla on medium/high speed until smooth and creamy. Store the frosting in the refrigerator until ready to use. Take out of the fridge 5 minutes before frosting.
To assemble the cake, place one layer of the cake on a large cake plate or pedestal. Put about 2/3 cup frosting on the cake and use an off set spatula to evenly distribute the frosting. Place the second cake layer on top and use the remaining frosting on the top and sides of the cake. This cake will keep covered in the refrigerator for up to 3 days.

Tuesday, December 29, 2009
Italian Comfort Food
Crostini with Gorgonzola and Honey
Butternut Squash and Sage Risotto
Roasted Brussels Sprouts
Pear Crumb Cake


Crostini with Gorgonzola and Honey
These simple toasts are both sweet and savory and make a scrumptious pre dinner snack. I suggest using a medium/soft gorgonzola cheese, something in between dry and crumbly and gooey and soft.

Serves 8
Ingredients
- 1 French baguette
- 8 ounces of gorgonzola cheese
- about 1/4 cup good quality honey
Preheat oven to 375 degrees F. Slice the baguette 1/3 inch thick, at an angle. Place bread slices on a large baking sheet, and bake until golden brown, about 10 minutes, flipping half way through baking. Toast can be cooled and stored in a plastic zip lock bag overnight.
Place about 1 tablespoon of gorgonzola cheese on each bread slice and position all the toasts on a large baking sheet. Broil on high heat until cheese starts to melt, about 3 minutes. Place the toasts on a large serving platter and drizzle with honey. Serve warm.
Butternut Squash and Sage Risotto
There is nothing exotic about this risotto, however the classic combination of butternut squash and sage is so warm and comforting and therefore perfect for risotto, an equally warm and comforting dish.

Serves 6
Ingredients
- 10-12 cups vegetable stock
- 2 tablespoons butter
- 2 tablespoons olive oil
- 1 pound butternut squash, peeled, cut into 1/2 inch cubes
- 1 cup diced leeks
- 1/4 cup fresh sage, stems removed, plus more for garnish
- 2 cups Arborio rice
- 1/2 cup parmesan cheese, plus more for garnish
- salt and fresh ground pepper
Heat the vegetable stock in a medium saucepan and bring to a simmer. Meanwhile, in a medium size heavy bottom saucepan heat 1 tablespoon of the butter and the olive oil over medium heat. Add the diced leeks and cook, stirring occasionally, for 3-4 minutes or until soft. Add the butternut squash, season with salt and pepper, and sauté with the leek for 3/4 minutes more, or until tender and slightly caramelized. Reduce the heat to medium/low and add the rice and the fresh sage and stir all the ingredients together for 1 minute more. Ladle approximately 3/4 cup of the hot vegetable stock into the rice. Continuously stir and once the rice has absorbed almost all the stock (after about 3-4 minutes) ladle another 3/4 cup of stock into the rice. Repeat this process of adding 3/4 cup of stock into the rice once the previous stock has been absorbed until the rice is tender, about 35-45 minutes. Once the rice is tender, stir in the parmesan cheese and the remaining butter. Taste for more salt and pepper. Serve immediate and top with parmesan cheese and sage.
Roasted Brussels Sprouts
If you think you don't like brussels sprouts try them roasted before you settle on your decision. Roasting brussels sprouts in the oven until they are caramelized and crispy takes away that gaggy cabbage flavor and brings out a wonderful nuttiness.

Preheat the oven to 425 degrees. To trim the brussels sprouts, removed the outer leafs and cut off the stem end. In a large roasting pan toss the brussels sprouts with salt, pepper and olive oil. Roast for 25-35 minutes or until the brussels sprouts are caramelized and golden brown. Serve warm.
Pear Crumb Cake
One bite of this cake brings me back to Rossana’s table in Italy. The scent of almond extract and a hint of lemon give this simple cake the freshness and flavor that epitomizes a typical rustic Italian dessert. The delicate flavor and texture of the pear perfectly compliments the lightness of this cake. This light winter cake is the perfect contrast after a heartier meal.

Serves 8
Ingredients
Topping
- 1/2 cup all purpose flour
- 1/2 teaspoon almond extract
- pinch of salt
- 1/4 cup light brown sugar
- 3 tablespoons cold unsalted butter, cut into 1/4 inch pieces
Cake
- 1/2 cup unsalted butter, at room temperature
- 1/2 cup sugar
- 1 teaspoon vanilla bean extract
- 1/4 teaspoon lemon zest
- 1 teaspoon almond extract
- 2 eggs
- 1 cup all purpose flour
- 1/4 teaspoon salt
- 2 teaspoon baking powder
Pears
- 2 firm pears
- 1 teaspoon fresh lemon juice
- pinch of salt
- 1/4 teaspoon vanilla bean extract
To make the topping combine the flour, almond extract, salt and sugar. Use your fingers to rub the cold butter into the dry ingredients until it resembles coarse crumbles. Refrigerate until needed.
Preheat the oven to 375 degrees F. Lightly grease a 9 inch springform pan with butter. Line the bottom of the pan with parchment paper.
To make the cake, cream the butter and sugar together until light and fluffy, about 4 minutes on medium speed with a mixer. Add the lemon zest, vanilla bean extract and almond extract. Add the eggs, one at a time, mixing after each addition. Gently stir in the dry ingredients (flour, baking soda and salt). Pour the batter into the prepared pan.
Peel and core the pears, then slice into approximate 1/4 inch by 1/2 inch slices. Toss the pears with the lemon juice, salt and vanilla extract. Pour the pears on top of the cake batter. Finally, evenly distribute the crumb mixture on top of the pears. Bake for 50-60 minutes or until the cake is golden brown on top and is cooked in the center. Let the cake cool for 15 minutes, then remove the sides of the springform pan. Use a spatula to slide the cake off the bottom of the pan and peel off the parchment paper, or leave pan bottom on cake. Serve warm or at room temperature with a dollop of whipped cream.
Butternut Squash and Sage Risotto
Roasted Brussels Sprouts
Pear Crumb Cake


Crostini with Gorgonzola and Honey
These simple toasts are both sweet and savory and make a scrumptious pre dinner snack. I suggest using a medium/soft gorgonzola cheese, something in between dry and crumbly and gooey and soft.

Serves 8
Ingredients
- 1 French baguette
- 8 ounces of gorgonzola cheese
- about 1/4 cup good quality honey
Preheat oven to 375 degrees F. Slice the baguette 1/3 inch thick, at an angle. Place bread slices on a large baking sheet, and bake until golden brown, about 10 minutes, flipping half way through baking. Toast can be cooled and stored in a plastic zip lock bag overnight.
Place about 1 tablespoon of gorgonzola cheese on each bread slice and position all the toasts on a large baking sheet. Broil on high heat until cheese starts to melt, about 3 minutes. Place the toasts on a large serving platter and drizzle with honey. Serve warm.
Butternut Squash and Sage Risotto
There is nothing exotic about this risotto, however the classic combination of butternut squash and sage is so warm and comforting and therefore perfect for risotto, an equally warm and comforting dish.

Serves 6
Ingredients
- 10-12 cups vegetable stock
- 2 tablespoons butter
- 2 tablespoons olive oil
- 1 pound butternut squash, peeled, cut into 1/2 inch cubes
- 1 cup diced leeks
- 1/4 cup fresh sage, stems removed, plus more for garnish
- 2 cups Arborio rice
- 1/2 cup parmesan cheese, plus more for garnish
- salt and fresh ground pepper
Heat the vegetable stock in a medium saucepan and bring to a simmer. Meanwhile, in a medium size heavy bottom saucepan heat 1 tablespoon of the butter and the olive oil over medium heat. Add the diced leeks and cook, stirring occasionally, for 3-4 minutes or until soft. Add the butternut squash, season with salt and pepper, and sauté with the leek for 3/4 minutes more, or until tender and slightly caramelized. Reduce the heat to medium/low and add the rice and the fresh sage and stir all the ingredients together for 1 minute more. Ladle approximately 3/4 cup of the hot vegetable stock into the rice. Continuously stir and once the rice has absorbed almost all the stock (after about 3-4 minutes) ladle another 3/4 cup of stock into the rice. Repeat this process of adding 3/4 cup of stock into the rice once the previous stock has been absorbed until the rice is tender, about 35-45 minutes. Once the rice is tender, stir in the parmesan cheese and the remaining butter. Taste for more salt and pepper. Serve immediate and top with parmesan cheese and sage.
Roasted Brussels Sprouts
If you think you don't like brussels sprouts try them roasted before you settle on your decision. Roasting brussels sprouts in the oven until they are caramelized and crispy takes away that gaggy cabbage flavor and brings out a wonderful nuttiness.

Preheat the oven to 425 degrees. To trim the brussels sprouts, removed the outer leafs and cut off the stem end. In a large roasting pan toss the brussels sprouts with salt, pepper and olive oil. Roast for 25-35 minutes or until the brussels sprouts are caramelized and golden brown. Serve warm.
Pear Crumb Cake
One bite of this cake brings me back to Rossana’s table in Italy. The scent of almond extract and a hint of lemon give this simple cake the freshness and flavor that epitomizes a typical rustic Italian dessert. The delicate flavor and texture of the pear perfectly compliments the lightness of this cake. This light winter cake is the perfect contrast after a heartier meal.

Serves 8
Ingredients
Topping
- 1/2 cup all purpose flour
- 1/2 teaspoon almond extract
- pinch of salt
- 1/4 cup light brown sugar
- 3 tablespoons cold unsalted butter, cut into 1/4 inch pieces
Cake
- 1/2 cup unsalted butter, at room temperature
- 1/2 cup sugar
- 1 teaspoon vanilla bean extract
- 1/4 teaspoon lemon zest
- 1 teaspoon almond extract
- 2 eggs
- 1 cup all purpose flour
- 1/4 teaspoon salt
- 2 teaspoon baking powder
Pears
- 2 firm pears
- 1 teaspoon fresh lemon juice
- pinch of salt
- 1/4 teaspoon vanilla bean extract
To make the topping combine the flour, almond extract, salt and sugar. Use your fingers to rub the cold butter into the dry ingredients until it resembles coarse crumbles. Refrigerate until needed.
Preheat the oven to 375 degrees F. Lightly grease a 9 inch springform pan with butter. Line the bottom of the pan with parchment paper.
To make the cake, cream the butter and sugar together until light and fluffy, about 4 minutes on medium speed with a mixer. Add the lemon zest, vanilla bean extract and almond extract. Add the eggs, one at a time, mixing after each addition. Gently stir in the dry ingredients (flour, baking soda and salt). Pour the batter into the prepared pan.
Peel and core the pears, then slice into approximate 1/4 inch by 1/2 inch slices. Toss the pears with the lemon juice, salt and vanilla extract. Pour the pears on top of the cake batter. Finally, evenly distribute the crumb mixture on top of the pears. Bake for 50-60 minutes or until the cake is golden brown on top and is cooked in the center. Let the cake cool for 15 minutes, then remove the sides of the springform pan. Use a spatula to slide the cake off the bottom of the pan and peel off the parchment paper, or leave pan bottom on cake. Serve warm or at room temperature with a dollop of whipped cream.
Tuesday, November 3, 2009
Stracciatella Cheesecake

To the untrained eye Stracciatella Gelato, a common flavor found in Italian Gelaterias, could be equated to Vanilla Chocolate Chip Ice Cream. However, after considerable evaluation, I have come to the conclusion that Stracciatella Gelato and Vanilla Chip Ice Cream are in fact very dissimilar from one another. Stracciatella Gelato is white in color as opposed to Vanilla Chip Ice Cream that has a custard base resulting in a custard color. Unlike ice cream, real Italian gelato is often made without eggs or egg yolks (the contributing custard factor) and has less fat and less air than American ice cream, which ultimately results in a creamier confection with an entirely different taste. Stracciatella’s sweet cream base is studded with fine dark chocolate chip shavings, giving every creamy bite a subtle crunch, which I find much more satisfying than the harsh whole chocolate chips found in Vanilla Chip’s icier, airier counterpart. Now, I don’t mean to bad talk Vanilla Chip Ice Cream, but rather want to set the stage for the inspiration to the flavor and texture of this cheesecake.
Like ice cream, cheesecake has a many different styles based on its own criteria of flavors and textures. I can’t say that I am one of cheesecake’s most devout fans, as I have had many below par cheesecakes which where either too dry, too sweet, too rich, not rich enough, flavorless, etc. On the contrary, this cheesecake, like Stracciatella Gelato, has a smooth and creamy base with a depth of flavor (in this case from the addition of ricotta cheese) and also a delicate crunch from the chocolate shavings. Though unlike Stracciatella Gelato, Stracciatella Cheesecake does require eggs, yet the inside of the cake looks just the same as the gelato - a white cream base studded with dark chocolate shavings. Therefore, I it is only fitting to call this cheesecake, Stracciatella Cheesecake and not Chocolate Chip Cheesecake. Just as Stracciatella Gelato and Chocolate Chip Ice Cream are not interchangeable, Stracciatella Cheesecake and Chocolate Chip Cheesecake are not interchangeable, as they are entirely different entities.
I make my own crisp chocolate cookies for the crust (well worth the extra time as opposed to using store-bought cookies), and serve a tangy cherry sauce alongside the cheesecake, which isn’t obligatory, but compliments the cheesecake exceptionally well. The cheesecake needs to be baked one day ahead of time, and allowed time to set-up completely in the refrigerator. I bake this cake using a water bath, which is a very simple procedure. A water bath helps the cake cook evenly, ensuring a creamy confection.

Stracciatella Cheesecake
Serves 12
Ingredients
Crust
- 1 cup all purpose flour
- 1/2 cup sugar
- 1/4 unsweetened cocoa powder
- 1/4 teaspoon salt
- 6 tablespoons unsalted butter, cold, cut into 1/2 cubes
- 1 egg yolk
- 1 tablespoon cream
Filling
- 1 1/2 pounds cream cheese, soft
- 1 1/4 cup sugar
- 8 ounces full fat ricotta cheese, at room temperature
- 1 teaspoon vanilla
- 1/2 teaspoon salt
- 3 eggs, at room temperature
- 4 ounce bar good quality bittersweet chocolate
To make the cookie crust, combine the flour, sugar, salt and cocoa powder in a food processor fitted with a steel blade. Add the butter and pulse everything together until just combined. Add the egg yolk and cream and pulse until well combined. Remove the dough from the food processor and combine into a flat disk. Wrap the dough in plastic and refrigerate for at least 2 hours or overnight. Roll the dough 1/4 inch thick and cut with a cookie cutter or knife into approximately 2 inch rounds or squares. Bake the cookies on a baking sheet, lined with parchment paper, at 350 degrees F for 13-15 minutes, or until crisp. Remove the cookies from the sheet pan and let cool completely. Pulse cooled cookies in a food processor. This process can be done up to 2 days ahead of time.
Preheat your oven to 350 degrees F. Boil some water to prepare for the water bath. Use a sharp knife to shave the chocolate bar into small pieces. Set aside.
Wrap aluminum foil tightly around a 9 inch springform pan. Press the cookie crumb mixture into the bottom of the springform pan. Refrigerate while preparing filling.
To make the filling, beat the cream cheese and sugar in a large mixing bowl fitted with a paddle attachment, until smooth. Scrape down the sides of the bowl, and add ricotta cheese, vanilla, and salt, and blend together well. Add the eggs, one at a time, scraping down the bowl after each addition. Fold in the chocolate chips by hand, and pour mixture on top of the crust. Set the cake pan into a large roasting pan, and pour hot water into the roasting pan so that it comes half way up the side of the cake pan. Carefully place both pans into the oven and bake for 1 hour and 15 minutes. Remove both pans from the oven and carefully remove the cake from the water bath, remove the foil, and set aside on a wire wrack to cool completely. Refrigerate the cake overnight or for at least 8 hours.
When the cake is ready to be served run a sharp knife along side the edges of the pan and release and remove the sides of the springform pan. To slice the cake dip a large, sharp knife into hot water and wipe the knife dry with a clean towel before making each cut. Serve with the cherry sauce and enjoy. This cake will keep covered and refrigerated for up to five days.

Cherry Sauce
Ingredients
- 1 pound fresh or frozen bing cherries, pitted
- 1/3 cup sugar
- 1 tablespoon fresh lemon juice
- 1 vanilla bean or 1 teaspoon vanilla bean paste
Combine all the ingredients in a medium sized saucepan and cook over low heat for about 10 minutes. Take the pan off the burner and let cool 10 minutes. Use a hand held blender or place the sauce in a blender and puree for 30 seconds. Refrigerate for up to 3 days. Heat slightly in a small saucepan before serving.
Friday, October 16, 2009
Pumpkin and Spice and Everything Nice

Pumpkin Spice Cake with Orange Cream Cheese Frosting
The fragrance of pumpkin and spice baking in the oven was a pleasing premonition to the flavors of Thanksgiving soon to come. The aroma was in fact so pungent that my poor diabetic dog followed the cake around the kitchen with her noise high in the air. By mere smell both the dog and I could already tell how delicious this cake was going to be. Indeed our sense of smell did not lead us astray- the cake was moist and flavorful and paired wonderfully with orange scented cream cheese frosting.
Serves 12
Ingredients
Cake
- 1/2 cup (1 stick) unsalted butter, room temperature
- 2 1/2 cups all purpose flour
- 2 teaspoons baking powder
- 1 teaspoon baking soda
- 1/4 teaspoon salt
- 1 1/2 teaspoons ground cinnamon
- 1/4 teaspoon ground clove
- 1/2 teaspoon ground nutmeg
- 1/4 teaspoon ground ginger
- 3/4 cup brown sugar
- 3/4 cup granulated sugar
- 2 eggs
- 1 fifteen ounce can pumpkin puree
- 1/3 cup sour cream
Frosting
- 8 oz package cream cheese, room temperature
- 1/2 cup (1 stick) unsalted butter, room temperature
- 1 tablespoon orange zest
- 14 ounces powdered sugar
- 1 teaspoon vanilla extract


Preheat the oven to 350 degrees. Butter and flour two 8 inch cake pans. Line the bottom of each cake pan with parchment paper. Set aside.
In a medium size bowl, sift together flour, baking powder, salt, and spices.
Place the butter and sugars in a medium size bowl fitted for an electric mixer. Cream together on medium/high speed until pale and fluffy. Add the eggs, one at a time, beating until each is incorporated, scraping down sides of bowl as needed. Reduce the speed to low and add the pumpkin puree. Add the flour mixture in two batches, alternating with the sour cream; beating until combined after each addition.
Divide the batter evenly among the cake pans. Bake the cakes until a cake tester inserted in centers comes out clean, about 35-40 minutes. Transfer the cake pans to wire racks and let cool for 15 minutes. Carefully run a knife alongside the edges of the cake and the pan, then invert the cake onto a flat plate. Remove the parchment paper. Invert the cake back onto a wire rack to cool completely.
To make the frosting, cream together the cream cheese, butter, powder sugar, orange zest and vanilla on medium/high speed until smooth and creamy. Store the frosting in the refrigerator until ready to use. Take out of the fridge 5 minutes before frosting.
Place one layer of the cake on a large cake plate or pedestal. Place about 2/3 cup frosting on the cake and use an off set spatula to evenly distribute the frosting. Place the second cake layer on top and use the remaining frosting on the top and sides of the cake. The cakes can be made 1 day ahead of time, and individual wrapped in plastic before frosting. This cake will keep cover in the refrigerator for up to 3 days.

Tuesday, August 4, 2009
Plum Topped Torte

Out of the oven, this cake is turned upside down causing all of the sweet plum juice to seep into the almond scented cake. The color of the plum juice depends on what time of the summer (or early fall) this cake is made. I try to make this torte at the beginning of summer when I can find the dark purple plums with red flesh, like the Black Beauty variety. Come July I seem to only find dark plums with white flesh. I have also made this torte many times with Santa Rosa plums, which have a more reddish skin and flesh. However, I am just being picky; there are many varieties of plums (or even pluots) that taste wonderful in this cake. This rustic summer torte is perfect to serve to guests after dinner or with a cup of coffee or tea in the afternoon, since the almond scented cake is light and the plums are tart, yet subtly sweet.

Plum Topped Torte
Serves 8-10
Ingredients
- 10 medium semi-ripe plums, cut in half, pits removed
- 1 1/2 cup all purpose flour
- 2 teaspoons baking powder
- 1/2 teaspoon salt
- 4 large eggs
- 1 cup sugar, plus 1/4 cup
- 1 teaspoon almond extract
- 1/2 teaspoon vanilla extract
- 1/2 cup unsalted butter, melted; plus 2 tablespoons
unsalted butter at room temperature
Preheat oven to 350 degrees F. To prepare a 9 inch round springform pan, combine the 1/4 cup sugar with the 2 tablespoons of butter, and spread evenly on the bottom of the pan. Arrange plum halves on top of the butter/sugar mixture flesh side down, as tightly as possible. If you have any extra plums, cut into smaller pieces and fill in any gaps.
To make the cake, sift together the flour, baking powder and salt. Set aside. In a large bowl fitter for an electric mixer beat the eggs and sugar until thick and pale, about 8 minutes on high speed. Stir in the almond and vanilla extracts. Gently fold in the dry ingredients. When all the ingredients are fully incorporated, gently stir in the melted butter. Pour the cake mixture into the pan on top of the plums. Bake for 1 hour to 1 hour and 5 minutes, or until a cake tester inserted into the center of the cake comes out clean. Allow the cake to cool for 10 minutes, then run a knife along side the edge and release the sides. Invert the cake onto a large plate or cutting board. Careful; the plum juice may drip onto the plate/ board. Let the cake cool completely. Serve alone or with a dollop of crème fresh or vanilla ice cream. This cake can be made one day ahead of time and kept covered.
Below is a photo from last summer's Plum Torte, where I used a variety of plums, including some with amber flesh, giving the torte a slightly different look (and taste) from the torte in the photos above, which was solely made from plums with red flesh.

Subscribe to:
Posts (Atom)