Sunday, August 30, 2009

Lighter Desserts

Rossana's Fruit Salad
Holy Vegan Cookies


Rossana’s Fruit Salad
Rossana, the woman who I lived with in Italy when I was studying abroad, made this fruit salad for me every week, with the fruit changing, depending on what was in season. The key to her fruit salad is to cut up the fruit into rather small pieces and add lots of lemon juice and sugar. Eating a bowl of this fruit instantly brings me back to Rossana’s tiny Italian kitchen table. I ate (and eat) this fruit salad for both breakfast and after dinner for dessert. Certainly this fruit salad can be made with whatever types of fruit that one prefers.


Ingredients
- 2 peaches or nectarines (or 1 apple)
- 2 plums (or 2 kiwi)
- 1 banana
- 3/4 cup grapes
- 2 1/2 tablespoons fresh lemon juice
- 1 1/2 tablespoons sugar

Cut the peaches or nectarines in half, remove the pits, slice into 1/2 thick wedges and then cut each slice to make 1/2 inch pieces. Cut the plums (or the apple) in a similar fashion. If you are using kiwi, cut the top and the bottom off each kiwi and use a sharp paring knife to remove the kiwi skins. Cut the kiwi into 1/2 inch pieces. Slice the grapes in half. Toss all of the fruit together in a medium bowl with the lemon juice and the sugar. Add more lemon juice or sugar depending on how marinated you want the fruit salad to be. The more lemon juice you add the more sugar you must also add. Let the fruit salad marinate in the refrigerator for at least an hour and up to 4 hours. Just before you are ready to serve the salad, peel the banana and cut into 1/2 inch slices. Cut the banana slices in half and gently toss together with the fruit salad.


Holy Vegan Cookies
Quite often I “veganize” muffin or cookie recipes by replacing the butter with canola oil and the egg with mashed banana. Depending on what I am making, I even substitute the white flour for a more hearty flour and the sugar for agave. Rarely do I ever write the recipe down or bother to remember what I had added or subtracted to a recipe in the past, which consequently varies my finished product.
On one specific occasion, I made a batch of oatmeal raisin cookies (with dark chocolate chips) for my mom to take to a church group outing. The Deacon, who was part of the day trip, apparently became quite fond of these dairy free cookies and asked for the recipe. Unfortunately, I did not have the recipe to pass on to him. For the next four months each time my mom ran into the Deacon, he kindly reminded her that he wanted the recipes for the cookies. and Ultimately I was convinced to retrace my steps and remake the cookies, and this time, writing it down for the Deacon. We therefore named these cookies ‘Holy Vegan Cookies.’
This recipe is a great base for vegan or non-vegan oatmeal cookies. Here I have added good quality semi sweet chocolate chips (that just so happen to be dairy free) and raisins. Pecans, macadamia nuts, dried cherries, golden raisins, dried apricots or other types of chocolate would also be good in these slightly healthier and heartier, oatmeal vegan cookies.


Ingredients
- 3 cups old fashion oats
- 1 1/2 cups all purpose flour
- 1/2 teaspoon salt
- 1 teaspoon ground cinnamon
- 1 teaspoon baking powder
- 1 teaspoon baking soda
- 1 teaspoon vanilla extract
- 1 cup packed brown sugar
- 1/2 cup granulated sugar
- 1/2 cup canola oil
- 1 cup raisins
- 1 cup dark chocolate chips

Preheat the oven to 350 degrees F.
In a large bowl mix together the canola oil, brown sugar and granulated sugar. Add the vanilla extract and the mashed banana and mix until combined.
In a separate bowl sift together the flour, baking soda, baking powder, salt and cinnamon.
Add the dry ingredients to the banana/oil mixture and gently stir until combined, being careful not to over mix the dough. Finally, stir in the oats, raisins and chocolate chips.
Drop tablespoon size drops of cookie dough onto unlined baking sheets 2 inches apart and bake for 10-13 minutes or until the cookies are light golden brown. Remove the pan from the oven and let the cookies cool on the pan for 1 minute and then transfer the cookies to a wire rack to cool. Store the cool cookies in an airtight container for up to 2 days.

Friday, August 28, 2009

Farmer's Market Dinner

A typical dinner on my table- a simple pasta dish and a few fresh vegetables.

Tossed Green Salad
Grilled Eggplant
Farmer's Market Green Beans
Lemon Ricotta Fusilli


Grilled Eggplant
There are many varieties of this late summer vegetable. Depending on the type of eggplant and its freshness, it sometimes needs to be "degorged," meaning salted and rinsed with water to remove the bitterness. I have found that Japanese eggplants (which tend to be smaller and more narrow) are usually less bitter and more tender than the larger Italian eggplants. I have also found that the older the eggplant is, the more bitter it is. Fresh eggplants are firm to the touch and if cooked within a day or two should not need to be salted and rinsed. When I do feel the need, or have the extra time, I slice the eggplant, line on a baking sheet, salt generously and let sit for about 1 hour. I use a paper towel to absorb the water that is extracted from the eggplant. Here, I did not salt the eggplant prior to grilling and could not taste any bitterness in the dish. So the debate - to salt or not to salt? I leave it up to you.


Serves 4

Ingredients
- 1 large Italian Eggplant or 2 medium Japanese Eggplants
- 3-4 tablespoons extra virgin olive oil
- 1 teaspoon salt
- 1/2 teaspoon fresh ground pepper
- 2 tablespoons fresh flat leaf parsley, chopped

Slice the eggplant lengthwise 1/4 inch thick and brush with the olive oil. Season the eggplant with half of the salt and pepper.
Meanwhile oil a grill pan and preheat over medium heat for 2 minutes. Place the eggplant slices on the hot grill pan and cook the eggplant 4-5 minutes on each side, or until the eggplant begins turn translucent in color and there are dark brown grill marks. Work in batches if necessary. Transfer the hot eggplant to a large plate or platter and immediately season with the remaining salt and pepper. Drizzle 1 tablespoon of extra virgin olive oil and the chopped parsley over the eggplant. Serve warm or at room temperature.


Farmer's Market Green Beans
The beautiful purple green beans actually turned green when cooked.


Cooking Green Beans

I don’t always care to blanch (cook in boiling water and immediately cool in ice water) my vegetables for two reasons. One- because it means I have one more bowl to clean, and two- because I don’t always like super crisp vegetables. I often prefer to cook my vegetables in boiling water until tender, then drain the water and let the vegetables steam in the hot pan until the rest of my dinner is ready to serve. There are certainly more exotic things to do with green beans, or any vegetable for that matter, but when I buy fresh produce from the farmer’s market, like these green beans, I actually want to taste the green beans and prefer a touch of good olive oil, salt and pepper. There is no recipe but merely my method.

Fill a medium size pan with water and bring to a boil. Add 1/2 tablespoon of salt to the water. Once the water has come to a boil add the green beans and cook until tender, about 7-8 minutes, or cook longer if you prefer more cooked green beans. Test the green beans with a fork and either use the lid to drain the water from the green beans or drain the green beans in a colander and return the green beans back into the hot pan. Season the green beans with salt and fresh ground pepper and a drizzle of extra virgin olive oil. Lemon zest is also a nice subtle addition as well. Serve warm.


Lemon Ricotta Fusilli
This pasta is so good and creamy, yet also has a refreshing lemony scent. I make this simple dish often, because with only a few ingredients I can make the sauce in the time it takes to cook the pasta.


Serves 6

Ingredients
- 1 pound Fusilli (corkscrew) pasta
- 15 ounces whole milk ricotta, at room temperature
- zest and juice of one lemon (preferably organic)
- 1/3 cup fresh grated parmesan cheese
- 1/3 cup good quality extra virgin olive oil
- 1 teaspoon salt
- 1/2 teaspoon pepper
- 1/4 teaspoon of fresh grated nutmeg

It is best if the ricotta is not ice cold out of the refrigerator, however the ricotta cannot be heated much or it will become very runny. It is best if the ricotta is at room temperature, or you can put the ricotta in a microwave proof bowl and heat for 30 seconds to 1 minute.
Meanwhile, bring a large pot of salted water to a boil. Add the fusilli pasta to the boiling water and cook until a dente; meaning that the pasta has a ‘bite’ to it without being chalky in the middle, about 10 minutes.
In a large serving bowl mix together the ricotta, lemon zest, lemon juice, parmesan cheese, olive oil, salt, pepper, and nutmeg.
Reserve 1/4 cup of the pasta water for the sauce. When the pasta is al dente, drain the pasta noodles and immediately add to the ricotta mixture along with the 1/4 cup of reserved pasta water. Toss all the ingredients together and season with more salt and pepper if needed. Serve warm.

Wednesday, August 26, 2009

Food Philosophy


What comes out is only as good as what goes in.
Huh? My style of cooking is very simple and relies on really good quality ingredients. Therefore, my dishes are only as good as the ingredients that go in them.
This can mean going to great lengths to make a very simple dish. There are times that I visit multiple stores before I settle on ingredients that are up to par. I prefer to buy all organic and local produce at either a farmer’s market or the organic grocery store. I am also one of those obnoxious label readers that spends hours examining boxes, bottles, packages and produce in the grocery store aisle. Now, I fully understand that the average person is not nearly as consumed with their cooking as I am, but when people ask or wonder why something tastes so great I can confidently say that really good ingredients are to credit. If you put poor quality ingredients into the dish you are certain to come out with a poor tasting dish. This is true in both cooking and baking.
I will use an example to clarify my argument. Let’s use my Baked Eggplant Stacks (recipe coming soon) as the example. I begin with a very simple tomato sauce, which relies on sweet plum tomatoes. At the store I choose a can of imported Italian plum tomatoes whose ingredients read: Imported Italian Plum Tomatoes. Look at the ingredients in your next store purchase and you might be surprised at what you will find. So often you are buying a lot more that you think. Another ingredient for my eggplant stacks is ricotta cheese. Again I choose the ricotta cheese that is the most pure and opt out of buying the ricotta cheese that has added stabilizers, like Xanthan Gum, which if you are wondering, “is a polysaccharide used as a food additive and rheology modifier. It is produced by fermentation of glucose or sucrose by the Xanthomonas camprestris bacterium. Synthesis originates from glucose as substrate for synthesis of the sugar nucleotides precursors UDP-glucose UDP-glucuronate, and GDP-mannose that are required for building the pentasaccharide repeat unit…”(1) Again, huh? If I don’t know what it is, then I am not going to eat it. I go with the organic ricotta cheese made from cow’s milk that was not treated with growth hormones. Not only do these ingredients taste better, but they are also better for you. I could go on and on about the extensive reasons why I buy what I buy and why I think you should buy pure, organic ingredients too, but I think you get my point. So, after I have carefully selected all of my ingredients for the Baked Eggplant Stacks, including organic eggs and organic eggplant, free of pesticides, I go home and start cooking.
I didn’t forget to mention that I bought really good quality olive oil and real Parmesan cheese at the store, because I already have those two ingredients in the "cupboard." Olive oil is an entire subject on its own, but for now, let me say that I strongly recommend buying a few types of olive oil, one for cooking and one for consuming raw (salad dressing, finishing touches over soups, pasta, etc.). In this recipe, I roast the eggplant with olive oil, so the medium quality extra virgin olive oil will suffice. Parmesan cheese, on the other hand, is a little more cut and dry. If it isn’t from Parma, Italy, then it isn’t Parmesan cheese. There are very strict guidelines for making Parmesan cheese and in Europe the name Parmesan legally and exclusively refers to the Parmigiano-Reggiano made from a specific area. There are generic “Parmesan” cheeses sold in the US under the name Parmesan, but they are merely imposters. I can go on and on, but let’s cut to the chase: buy the Parmesan cheese that has Parmigiano-Reggiano branded all along its rind. Why? Because only then can one know with absolute certainty that they are buying that nutty, buttery salty Parmesan cheese. It may seem that the real Parmesan cheese is more expensive, but a little goes a long way, and you will ultimately use less in your dish because the flavor of the cheese is so pungent that you will need less than if you bought the imposter kind.
I know; buying ingredients with me sounds like a headache, but it is pretty simple: buy the most pure and clean ingredients that are the best quality. If you don’t know what something is, then chances are it isn’t going to make your food taste better and it certainly isn’t better for you. Try to buy produce that is in season and organic. Again, food that traveled half way across the world that has been sprayed down with bug spray probably doesn’t taste too terribly fresh or wonderful to the pallet. If you can’t remember what produce is in season, shop at a local farmer’s market and you will be conveniently forced to buy seasonal produce. A little effort goes a long way, and if you are going to put the time and energy into preparing a meal, you might as well make it a good one and spend the extra effort getting high quality ingredients. This does not mean that I never take short cuts and buy prewashed mixed greens for a salad or pre-made pizza dough, but it does mean that I buy the organic mixed salad greens and go down to the pizzeria to buy fresh dough free of preservatives. Because the dishes that I make are simple and “clean,” they are not usually overly complicated and do not take hours on end to make. I justify buying quality ingredients that can cost a little more because, I ultimately use less ingredients and create less waste.
After a little research, and some trial and error, I no longer have to search high and low for my favorite ingredients. I know where to shop and what to buy. The same is true for baking, European style butter, fresh organic eggs and good quality chocolate make all the difference, but I will save that subject for a later point in time.
So… the moral of the story here is… use good quality ingredients when you cook, because what you put into your dish is consequently what you will get out of your dish.

1. "Xanthan gum." Wikipedia, The Free Encyclopedia. 20 Aug 2009, 18:38 UTC. 20 Aug 2009 .

Monday, August 24, 2009

Vanilla Bean Scented Yellow Peach Crisp


Vanilla Bean Scented Yellow Peach Crisp

Serves 6

Ingredients
Fruit Filling
- 8 almost ripe medium yellow peaches
- 1 teaspoon vanilla bean paste
- 1-2 tablespoons granulated sugar
Topping
- 3/4 cup all purpose flour
- 1/3 cup packed brown sugar
- 1/4 cup granulated sugar
- 6 tablespoons unsalted butter, cool (not quite at room temperature)
cut into 1/2 pieces
- pinch of salt
- 1/2 teaspoon vanilla extract or vanilla bean paste


Preheat the oven to 375 degrees F.
To make the crumb topping, combine the flour, brown sugar, granulated sugar and salt in a medium size bowl. Use your finger tips to combine the butter with the dry ingredients. Add the vanilla extra, and mix the topping together until it is well blended and resembles coarse crumbs. Set the topping mixture in the refrigerator while you prepare the peaches.
Cut the peaches in half and remove the pit. Cut each half into approximately 1/3 inch slices. Place the peach slices in a medium size glass or ceramic baking dish. Depending on the sweetness of the fruit, add 1 or 2 tablespoons of sugar. Gently combine the peaches, sugar and vanilla bean paste together.
Sprinkle the crumb topping evenly over the peaches. Bake for 40-45 minutes, or until the crumb topping is golden brown and the peaches are beginning to bubble. Remove the crisp from the oven and let sit 3 minutes before serving. Serve warm with vanilla ice cream.


Saturday, August 22, 2009

Easy Appetizers

Three easy (and delicious, may I add) appetizers that can all be made ahead of of time.

Blue Cheese with Candied Pecans and Blackberries
Roasted Vegetable and Cannellini Bean Dip with Crostini
Parmesan Crackers with Thyme and Black Pepper


Blue Cheese with Candied Pecans and Blackberries

These candied pecans take little time or effort to make and add an elegant touch to a cheese plate. I love the combination of tangy blue cheese with something sweet, blackberries in this case, with something crunchy, candied pecans. Depending on the time of the year I use different cheeses, different nuts and a different source of sweetness- sometimes honey or a good jam. There are endless combinations.


Candied Pecans

Ingredients
- 2 cups raw pecan halves
- 1 egg white
- pinch of salt
- 1/4 cup granulated sugar

Preheat the oven to 325 degrees F. In a medium bowl, gently toss together all of the ingredients and spread out on an unlined baking sheet. Bake the pecans for 20 to 25 minutes or until the nuts are golden brown. Use a metal spatula to toss the nuts half way through baking. Allow the nuts to cool completely on a clean plate, then transfer to an airtight glass jar. These nuts will keep for up to 2 weeks.


Roasted Vegetable and Cannellini Bean Dip with Crostini


This dip is actually better if made a day ahead of time. The flavors seems to meld together better after an overnight visit in the fridge. The crostini, too, can also be made a day ahead of time and kept in an airtight container. That way everything is ready to go.

Makes 4 cups

Ingredients
- 1 eggplant, peeled and cut in 1 inch cubes
- 1 red bell pepper, seeded and cut in 1 inch pieces
- 1 yellow bell pepper, seeded and cut in 1 inch pieces
- 1 small white onion, peeled and cut in 1 inch pieces
- 2 tablespoons olive oil
- 1 cloves garlic, minced
- 2 teaspoons salt
- 1 teaspoons pepper
- 1 fifteen ounce can of cannellini beans, drained and rinsed
- 1 teaspoon tomato paste
- 1/2 cup extra virgin olive oil, plus 1 teaspoon to garnish
- 3-4 basil leafs, finely chopped to garnish

Preheat the oven to 400 degrees F. On a large baking sheet toss together the chopped eggplant, red and yellow bell peppers, and onion with the olive oil and half of the salt and pepper. Bake the vegetables for 35 minutes. Remove the vegetables from the oven and let cool completely.
In a large food processor fitted with a steel blade, blend together the cannellini beans, roasted vegetables, garlic, remaining salt and pepper, tomato paste, and olive oil, until smooth. Taste for more salt and pepper.
Serve this dip in a small serving bowl and drizzle the remaining olive oil and chopped basil atop the dip. Place the dip in center of a large platter with the crostini arranged around it. You can make this dip a day or two ahead of time. It will keep in the refrigerator for up to 1 week.

Crostini

Ingredients
- 1 french baguette
- extra virgin olive oil

Preheat the oven to 375 degrees F. Slice the baguette about 1/3 inch thick at an angle. Arrange the bread slices on a large cookie sheet and drizzle with the olive oil. Bake for 10-15 minutes, or until light golden brown and crisp.


Parmesan Crackers with Thyme and Black Pepper


These bite size crackers are so easy to make and are absolutely delicious. Even better, when they are baking your home will be consumed with the fragrance of salty parmesan cheese. These crackers are perfect for entertaining because the dough can be made ahead of time (it will keep in the freezer for up to 2 months). I suggest baking these crackers just before guest arrive, so they too can enjoy the parmesan perfume.

Makes 40 small crackers

Ingredients
- 3 oz fresh grated parmesan cheese
- 1/2 cup (1 stick) unsalted butter, at room temperature
- 1 cup all purpose flour
- 1/2 teaspoon salt
- 1/2 teaspoon fresh ground pepper
- 1 1/2 teaspoons fresh thyme, leaves removed from stems and finely chopped


To make the dough, combine the butter, salt, pepper, parmesan cheese and thyme in a medium size bowl. Sift the flour into the butter mixture and gently stir until just combined. Transfer the dough to a large piece of parchment paper, and shape the dough into a log (with either round or squared edges). Roll the dough tightly into the parchment paper, and tuck in the sides of the parchment paper, so that the dough is covered completely cover. Refrigerate for at least 30 minutes or up to 6 hours.
Preheat the oven to 350 degrees F and large a large sheet pan with parchment paper. Place the refrigerated dough in the freezer for 5 minutes before slicing into 1/3 inch slices. Place the cracker slices 1 inch apart and bake for approximately 15 minutes, rotating the sheet pan half way through cooking. The crackers should be slightly golden brown. Remove the sheet pan with the crackers from the oven and allow the crackers to sit on the sheet pan for 1 minute, and then remove the crackers to a wire rack to cool completely.

Thursday, August 20, 2009

Arugula Salad with Nectarines, Goat Cheese and Pistachios

This salad is perfect to make during the summer when you can find sweet, ripe nectarines. It is wonderful to serve for either a side dish or as a simple main course salad.


Arugula Salad with Nectarines, Goat Cheese and Pistachios

Serves 4-6

Ingredients
- 6 cups baby arugula
- 2 ripe white nectarines, sliced into 1/3 inch slices
- 4 ounces goat cheese
- 1/2 cup toasted pistachios, roughly chopped
Dressing
- zest of 1 orange
- 1/3 cup fresh squeezed orange juice
- 2 tablespoons extra virgin olive oil
- 2 teaspoons honey
- pinch of salt
- pinch of pepper


To make the dressing, combine the orange zest and the orange juice with the honey, salt and pepper. While whisking slowly add the olive oil to create an emulsion. You can make the dressing up to three days in advance.
To assemble the salad toss the arugula in a large salad bowl with the dressing. Transfer the arugula to a serving platter. Place the sliced nectarine on top of the arugula and sprinkle the toasted pistachios over the salad. Use your hands to crumble the goat cheese into small chunks over the salad. Serve and eat immediately.


Tuesday, August 18, 2009

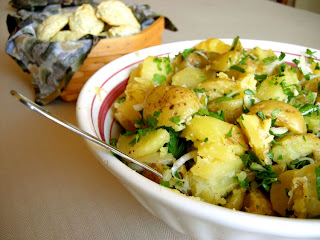
Warm Parsley Potato Salad

This potato salad is light and refreshing compared to the classic potato salad smothered in mayonnaise. I usually serve this salad warm, but it is great cold too.


Warm Parsley Potato Salad

Serves 8 side portions

Ingredients
- 5 pounds Yukon Gold Potatoes, preferably the same size, washed
- 2 cups (loosely packed) of parsley, chopped
- 1 small yellow or sweet onion, diced
- 2/3 cup extra-virgin olive oil
- 2/3 cup red wine vinegar
- 2 tablespoons salt
- 1 tablespoon pepper

Bring a large pot of salted water to a boil with the potatoes. Cook the potatoes until tender, about 20 minutes, depending on the size of the potatoes. Test the potatoes with a fork. They should be tender and slightly on the firmer side, but not raw. Meanwhile, combine the diced onion and the chopped parsley in a large serving bowl.
When the potatoes are tender, drain the water and let the potatoes cool for about 2 minutes or until you can handle them. Slice the hot potatoes about 1/3 inch thick and place in the bowl with the onion. The hot potatoes will soften and cook the onion. Add the salt and pepper to the potatoes. Then drizzle over the olive oil and vinegar. Gently toss the ingredients together. Add more salt and pepper to taste. Serve warm.

Sunday, August 16, 2009

Marinated Zucchini Salad

This dish is great to make when you are entertaining because you can make it ahead of time and pull it out of the fridge just before serving.


Marinated Zucchini Salad

Serves 12

Ingredients
- 8 medium zucchini
- 1 small red onion
- 10 cloves garlic, peeled, thinly sliced
- 1 yellow or red bell pepper
- 2 small firm tomatoes
- 1 1/2 cup fresh parsley, chopped
- salt
- fresh ground pepper
Dressing
- 1/2 cup good quality extra virgin olive oil
- 1/3 cup lemon juice
- 2 tablespoons fresh thyme, chopped
- 2 teaspoon salt
- 1 teaspoon pepper
- 4 tablespoons red wine vinegar


To make the dressing combine the lemon juice, thyme, salt, pepper and red wine vinegar. While whisking, slowly add the olive oil to create an emulsion. You can make this dressing up to three days ahead of time.
Cut the zucchini in half, lengthwise, then cut into thin slices, about 1/8 inch thick. Peel the red onion and cut in half. Slice the onion as thin as possible. Remove the core and seeds from the bell pepper and cut into very thin strips about 1/8 inch thick. Cut the tomatoes in half, core and thinly slice into 1/8 inch thick pieces. Place the chopped vegetables in a large bowl, along with the garlic. Add the parsley and season with salt and pepper. Pour the dressing over vegetables and toss to combine. Cover and refrigerate, to let marinade.
Make this dish at least three hours and up to eight hours before serving. Periodically take the salad out of the refrigerator and toss. Take the salad out of the refrigerator approximately 15 minutes before serving.

Friday, August 14, 2009

Warm Corn Salad with Shallots and Basil

This salad showcases sweet summer corn. It tastes wonderful either warm or cold and with either white or yellow corn. Hence, frozen corn will not suffice in this dish.


Warm Corn Salad with Shallots and Basil

Serves 6

Ingredients
- 7-8 ears corn on the cob (white or yellow)
- 2 tablespoons extra virgin olive oil
- 1 tablespoon butter
- 2 shallot, finely diced
- salt
- fresh ground pepper
- 1/3 cup fresh basil (about 6 medium size leafs)

Remove the husks and silk from the corn. Place corn in a large shallow dish or bowl and use a knife to cut the corn off the kernel. This will prevent the corn from going everywhere.
Heat a large sauté pan with the olive oil on medium heat for 1 minute. Add the butter and let it melt and combine with the oil. Add the shallots to hot oil and sauté for about 2-3 minutes until soft on medium to medium/low heat. Be careful not to burn butter or the shallots. Turn down the heat if needed. Add the corn kernels and about 1 teaspoon of salt and 1/2 teaspoon of pepper. Sauté the corn on medium/low to medium heat for approximately 7 minutes, stirring occasionally. The corn should be crisp, but cooked completely and not starchy. Add more salt and pepper to your taste.
Transfer the hot corn to a medium size-serving dish and let stand 5 minutes to cool slightly.
Chop the basil at the last minute, and sprinkle on top just before serving, or the basil will turn black and wilted if the corn is too hot.

Tuesday, August 11, 2009

Summer Salads

The next four entries will feature simple side salads that show off summer produce at its peak. These salads are perfect for a backyard summer barbeque, whether you are the one entertaining family and friends, or the guest in need of bringing a delicious side dish. These recipes are uncomplicated and easy to make and, therefore, rely on quality produce to make the perfect dish.

Monday, August 10, 2009

Cheesecake Brownies


There is little that needs to be said about these brownies, except that they are delicious and very easy to make. Enjoy.

Cheesecake Brownies

Makes approximately 24 brownies

Ingredients
Brownie Batter
- 1 stick unsalted butter, chopped
- 8 ounces bittersweet chocolate (62-68%), chopped
- 1 1/2 cup sugar
- 4 large eggs
- 1 teaspoon vanilla extract
- 3/4 cup flour
- 1/2 teaspoon salt
Cheesecake Filling
- 1 eight ounce package cream cheese, at room temperature
- 1/3 cup sugar
- 1 large egg
- 1 teaspoons vanilla extract
- canola oil, for greasing the pan


Preheat the oven to 350 degrees F. Grease a 13 by 9 inch baking dish.
Melt the chopped chocolate and the butter together in a double boiler or in the microwave. Be careful not to over heat and burn the chocolate. Set aside to cool.
Meanwhile, to make the cheesecake filling, place the soft cream cheese in a bowl fitted for an electric mixer, or use an electric hand mixer, and cream the cream cheese with 1/3 cup of sugar. Add the egg and vanilla extract and mix on medium speed until smooth and creamy, about 1 minute. Set the cheesecake mixture aside.
To finish making the chocolate brownie batter, add the sugar to the cooled chocolate and butter mixture and stir until combined. Add the 4 eggs, one at a time mixing until combined after each addition. Add in the vanilla extract. Sift the flour and salt over the chocolate mixture and gently fold the dry ingredients into the wet ingredients.
Pour the chocolate brownie batter into the greased pan. Drizzle the cheesecake batter over the chocolate batter. Use a knife to gently swirl the cheesecake batter into the chocolate brownie batter. Do not over mix the two batters or it will look like a real mess. Bake for about 40 minutes. The cheesecake part of the brownies should turn light golden brown and will slightly puff up. Let the brownies cool completely in the pan. Cut into desired sizes and serve. These brownies can be made a day ahead of time, but cut the brownies the day you plan to serve them.

Sunday, August 9, 2009

Good Granola


I have been making my “Good Granola” for many years now, but my original recipe has transformed greatly. I started off making stovetop granola, but I have found that baking the granola in the oven results in as equally delicious granola, without the constant stirring. I also rarely measure out the ingredients; just add a dash of this and that until it looks right. However, in order to make granola with consistency, I use the measurements in the recipe below, which can serve as the base for whatever type of nuts and dried fruit you prefer. I particularly love the combination of pecans and dried cranberries, or dried apricots and cashews, and I love to add a handful of seeds (pumpkin, sesame, or sunflower) too. I store the granola in an aluminum container to have on hand to sprinkle over fruit and yogurt in the morning, or for a quick pick-me-up snack in the afternoon.

Before Baking Granola

Good Granola

Makes 5 cups

Ingredients
- 2 1/2 cups oats (not quick cooking oats)
- 1 cup slivered almonds
- 1 cup pecans, roughly chopped
- 1/2 teaspoon of salt
- 2 tablespoons brown sugar
- 1 1/2 teaspoons ground cinnamon
- 1/2 cup honey
- 2 teaspoons canola oil
- 1/2 cup dried cranberries

Preheat the oven to 350 degrees F. Line a half sheet baking pan with nonstick aluminum foil. (If you do not have nonstick aluminum foil, do not line the baking sheet, otherwise the granola will stick.)
Meanwhile in a medium bowl, combine the oats, salt, cinnamon, nuts and brown sugar. (Note: Measure the oil into the measuring cup that you use to measure the honey to help the honey pour more easily.) Drizzle the honey and canola oil over the oats and toss together until combined, making sure the oats and nuts are evenly coated. Spread the granola out evenly on the lined baking sheet and bake for approximately 30 minutes, tossing after 10 minutes, then after every 5 minutes until it is done, to help the granola cook evenly. The granola is done and can be removed from the oven when the oats and nuts are medium golden brown in color. Remove the pan with the granola out of the oven and toss in the dried cranberries. Immediately lift up the aluminum foil with the granola and move to a countertop to cool completely. (If you are not using foil, transfer the granola to a large plate or another baking sheet to cool.) Serve the granola with milk or yogurt and fresh fruit. The granola will keep for approximately 2-3 weeks in a metal canister.

Baked Granola

Friday, August 7, 2009

Baby Arugula Salad with Roasted Veggies and Fresh Burrata Cheese


The making of Burrata cheese begins with the same process of making Mozzarella cheese; until the Mozzarella curdles, and are then dipped into hot salted water, kneaded, pulled and shaped, creating a slightly chewier consistency from true Mozzarella. The hot Burrata is formed into a pouch and then filled with fresh cream. Burrata is best eaten within 48 hours and therefore will most likely be found at a specialty cheese shop. Essentially, Burrata is Mozzarella’s creamier and more flavorful sister, and of course good quality Mozzarella (not the rubbery grocery store imitation) can be substituted in this salad. However, finding fresh Burrata cheese is worth its trouble.


Baby Arugula Salad with Roasted Veggies and Fresh Burrata

Serves 2 meal portions or 4 side portions

Ingredients
- 1 bunch fresh baby arugula, (6-8 cups) washed
- 1 yellow pepper, cut into strips
- 1 red pepper, cut into strips
- 1 small eggplant, sliced 1/4 inch thick
- 1 fennel bulb, sliced 1/4 to 1/2 inch thick
- 2 heirloom tomatoes, sliced 1/2 inch thick
- 2 balls of fresh Burrata cheese
- 2 tablespoons fresh grated parmesan cheese
- 1-2 tablespoons best quality extra virgin olive oil
- 1-2 tablespoons fresh lemon juice
- fresh ground pepper
- salt

Preheat the oven to 400 degrees. Place the sliced peppers, fennel and eggplant in a large roasting pan. Gently toss the vegetables with olive oil, salt and pepper. (I prefer to keep each type of vegetable to its own area of the pan, enabling me to remove the vegetables that cook more quickly than the others.) Roast the vegetables for 20-40 minutes, or until soft and slightly caramelized. The eggplant slices tend to take less time, about 20 minutes, and the peppers and fennel slices tend to take more time, about 40 minutes. When the eggplant slices are soft and begin to turn slightly brown, remove the eggplant slices from the pan and place on a plate. Set the eggplant aside and return the other vegetables back into the oven. Cook the pepper and fennel slices until soft and caramelized. Remove the pan from the oven and set aside to cool. The vegetables are best served at room temperature or slightly warm.
Meanwhile, place the arugula in a large platter or serving dish. Drizzle over the olive oil, lemon juice, grated parmesan cheese, salt and pepper. The measurements do not need to be exact. Arrange the tomato slices on top of the arugula. When the vegetables are cool arrange the vegetables atop the salad. Season the tomatoes and vegetable with a pinch more of salt and pepper. Place the fresh Burrata on top and finish off the salad with a final drizzle of best quality extra virgin olive oil. Serve immediately. The roasted vegetables can be made a few hours ahead of time and kept at room temperature until ready to serve.

Tuesday, August 4, 2009

Plum Topped Torte


Out of the oven, this cake is turned upside down causing all of the sweet plum juice to seep into the almond scented cake. The color of the plum juice depends on what time of the summer (or early fall) this cake is made. I try to make this torte at the beginning of summer when I can find the dark purple plums with red flesh, like the Black Beauty variety. Come July I seem to only find dark plums with white flesh. I have also made this torte many times with Santa Rosa plums, which have a more reddish skin and flesh. However, I am just being picky; there are many varieties of plums (or even pluots) that taste wonderful in this cake. This rustic summer torte is perfect to serve to guests after dinner or with a cup of coffee or tea in the afternoon, since the almond scented cake is light and the plums are tart, yet subtly sweet.


Plum Topped Torte

Serves 8-10

Ingredients
- 10 medium semi-ripe plums, cut in half, pits removed
- 1 1/2 cup all purpose flour
- 2 teaspoons baking powder
- 1/2 teaspoon salt
- 4 large eggs
- 1 cup sugar, plus 1/4 cup
- 1 teaspoon almond extract
- 1/2 teaspoon vanilla extract
- 1/2 cup unsalted butter, melted; plus 2 tablespoons
unsalted butter at room temperature

Preheat oven to 350 degrees F. To prepare a 9 inch round springform pan, combine the 1/4 cup sugar with the 2 tablespoons of butter, and spread evenly on the bottom of the pan. Arrange plum halves on top of the butter/sugar mixture flesh side down, as tightly as possible. If you have any extra plums, cut into smaller pieces and fill in any gaps.
To make the cake, sift together the flour, baking powder and salt. Set aside. In a large bowl fitter for an electric mixer beat the eggs and sugar until thick and pale, about 8 minutes on high speed. Stir in the almond and vanilla extracts. Gently fold in the dry ingredients. When all the ingredients are fully incorporated, gently stir in the melted butter. Pour the cake mixture into the pan on top of the plums. Bake for 1 hour to 1 hour and 5 minutes, or until a cake tester inserted into the center of the cake comes out clean. Allow the cake to cool for 10 minutes, then run a knife along side the edge and release the sides. Invert the cake onto a large plate or cutting board. Careful; the plum juice may drip onto the plate/ board. Let the cake cool completely. Serve alone or with a dollop of crème fresh or vanilla ice cream. This cake can be made one day ahead of time and kept covered.

Below is a photo from last summer's Plum Torte, where I used a variety of plums, including some with amber flesh, giving the torte a slightly different look (and taste) from the torte in the photos above, which was solely made from plums with red flesh.

Monday, August 3, 2009

Healthy Whole Wheat Banana Muffins


Basic Banana Muffins

These banana muffins are much healthier than their cake-light counterparts; made with whole-wheat flour and low in sugar and fat. Perfect for a healthy breakfast on the go, or afternoon snack. Of course you can adjust the sweetness to your liking. If you are watching your cholesterol the egg in the recipe can easily be replaced with 2 egg whites, or 1/2 a banana if you want to go vegan.
Fresh blueberries, or toasted pecans are also a nice addition to this basic muffin mix.

Makes 9 muffins

Ingredients
- scant 1 cup whole wheat flour
- scant 1 cup all purpose flour
- 1 teaspoon baking powder
- 1/2 teaspoon baking soda
- 1/2 teaspoon salt
- 1 teaspoon ground cinnamon
- 2/3 cup lightly packed brown sugar
- 1/2 cup low fat milk (or soymilk)
- 1 egg
- 1 teaspoon vanilla extract
- 1/2 cup canola oil
- 3 small bananas
- sanding sugar

Preheat the oven to 350 degrees F. Lightly oil 9 muffin tins. Mash the bananas in a small bowl and set aside. In a large mixing bowl combine the canola oil, brown sugar and vanilla. Then add the egg and mix in well. Add the dry ingredients (flours, baking powder, baking soda, cinnamon and salt) and gently mix together. Add the milk and banana and gently stir until combined. Distribute the batter equally into the nine oiled muffin tins and sprinkle each muffin with a small amount (about 1/4 teaspoon) of the sanding sugar.
Bake for about 20 minutes, or until the tops are golden brown. Let the muffins cool 1 minute in the pan, then run a butter knife around the edges of each muffin and transfer to a wire rack. Serve warm or keep in an airtight container for up to 3 days.

Sunday, August 2, 2009

The First Supper

A simple supper to start.

Gemelli with Caramelized Red Onions, Goat Cheese and Thyme
Tossed Green Salad with Heirloom Tomatoes
Roasted Zucchini with Parmesan and Parsley
Salted Caramel over Vanilla Ice Cream


Gemelli with Caramelized Red Onion, Goat Cheese and Thyme


The key to an amazing pasta dish is amazing ingredients. For this dish I used fresh thyme picked from the garden, a homegrown lemon, a beautiful red onion that looked like a cross between a red onion and a shallot from a local vegetable stand, and handmade dried pasta from an Italian specialty shop. Finally, fresh and local extra virgin olive oil finishes off this simple pasta dish.

Serves 6

Ingredients
- 1 pound gemelli or other short dried pasta
(such as fussili or penne rigate)
- 1 small red onion, chopped
- 1/4 cup extra virgin olive oil
- 3 medium shallots, chopped
- 5 ounces plain soft goat cheese
- 1 1/2 tablespoons fresh thyme
(about 5 -6 stems, leaves removed and finely chopped)
- zest of 1 large lemon
- fresh ground pepper
- sea salt

Bring a large pot of salted water to a boil. Meanwhile, heat the olive oil in a medium sauté pan over medium heat. Add the chopped red onion and shallots. Season with salt and cook over medium heat, stirring occasionally until the onion and shallots are soft. Continue to cook until the onions begin to brown and caramelize; about 10 minutes. Season with fresh ground pepper and add the chopped thyme.
When the water has come to a rapid boil, add the pasta and cook, according to the package, until al dente, tender. To test the pasta, remove one noodle and bite the center of the noodle; it should be tender but not chalky. When the pasta is al dente, immediately add the pasta to the sauté pan with the caramelized onions while reserving 1/2 cup of the pasta water. Transfer the pasta to a large serving bowl and crumble the goat cheese over the hot pasta. Add the lemon zest and 1/4 cup of the starchy pasta water and toss everything together. Add the remaining 1/4 cup of reserved pasta water if needed. Taste for more salt and pepper, drizzle with a bit of olive oil and serve immediately.


Roasted Zucchini with Parmesan and Parsley – Italian Style


The Italians may like their pasta with a bite, but prefer their vegetables thoroughly cooked. The zucchini in this dish are prepared as the Italians would… well done.

Serves 6

Ingredients
- 6 medium size zucchini
- 2 tablespoons extra virgin olive oil
- 1/4 cup fresh flat leaf parsley, chopped
- 1/4 cup fresh grated parmesan cheese
- fresh ground pepper
- sea salt

Preheat the oven to 425 degrees F. Cut each zucchini in half lengthwise, the cut into 1/2 inch pieces to create a half circle shape. In a large roasting pan toss the zucchini together with the olive oil and season with salt and pepper.
Roast the zucchini about 20 minutes. Remove the pan from the oven and transfer the zucchini to a serving bowl. Add the chopped parsley, parmesan cheese and season with more salt and pepper. Gently toss all of the ingredients together and serve immediately.


Salted Caramel over Vanilla Ice Cream


I had left over Salted Caramel Sauce (recipe follows) from my Caramel Apple Galettes, made earlier in the week, that was delicious when slightly heated and poured over vanilla ice cream, with a sprinkling of French sea salt.

Salted Caramel


Makes approximately 2 cups

Ingredients
- 1 1/4 cup granulated sugar
- 1/3 cup water
- 1 cup heavy cream
- 1/4 teaspoon vanilla extract
- 1/2 teaspoon sea salt, plus more for garnish

To make the caramel sauce combine the water and sugar in a medium heavy-bottom saucepan over low heat, without stirring until the sugar dissolves, about 5 minutes. Increase the heat to medium and bring to a boil without a lid. The sauce should continue to boil until is turns a golden chestnut brown, then turn off the heat. Do not stir the mixture with a spoon and be extremely careful not to get burned. Slowly, without splattering, pour the cream into the hot mixture. The mixture will violently bubble. Stir in the vanilla extract and turn a low heat back on. Stir until the sauce is smooth and creamy. Finally, remove the pan from the heat and add the sea salt. Let the sauce cool at room temperature for 1 hour. Store the sauce in a glass jar in the refrigerator for up to 1 week.