I am sorry that I do not have a photo for this recipe. It got gobbled up before I had a chance to take a photo (always a good sign), but with zucchinis in abundance right now, I had to share this deliciously moist loaf cake. Cake or Bread? It is somewhere in between the two, but regardless, it is a perfect choice for a late summer rustic dessert, afternoon snack or breakfast treat. I am guessing these would also bake up as wonderful little cupcakes... perhaps with a dollop of cream cheese frosting?
Zucchini Bread with Craisins and Dark Chocolate Chips
Tart craisins, sweet zucchini bread and dark chocolate – a perfect combination. The whole wheat pastry flour and spelt flour can be substituted for whole wheat flour and all purpose flour, if you like.
Makes 1 loaf
1 cups whole wheat pastry flour
1 cup spelt flour
1/2 teaspoons baking powder
1 teaspoon baking soda
3 teaspoons ground cinnamon
1/4 teaspoon freshly grated nutmeg
1/4 teaspoon salt
2 eggs
3/4 cup packed brown sugar
3/4 cup granulated sugar
1 cup canola oil
1 teaspoon vanilla extract
10 ounces grated zucchini
2/3 cup craisins
2/3 cup dark chocolate chips
Preheat the oven to 350 degrees F. Grease a 9 by 5 loaf pan with canola oil and line the bottom with parchment paper.
In a medium size bowl, combine the flours, baking soda, baking powder, cinnamon, nutmeg and salt. Set aside.
In another bowl combine the eggs and sugars with a whisk until well combined. Stir in the oil, vanilla extract and grated zucchini until well combined. Gently stir in the dry ingredients and the craisins and chocolate chips.
Pour the batter into the prepared loaf pan and bake for approximately 60 minutes, or until the top is golden brown and a toothpick inserted into the center of the bread comes out clean. Let the bread cool in the pan for 10 minutes; then transfer to a wire rack to cool completely. This bread will keep wrapped tightly in plastic wrap for up to 3 days.
Showing posts with label chocolate. Show all posts
Showing posts with label chocolate. Show all posts
Tuesday, August 31, 2010
Sunday, August 1, 2010
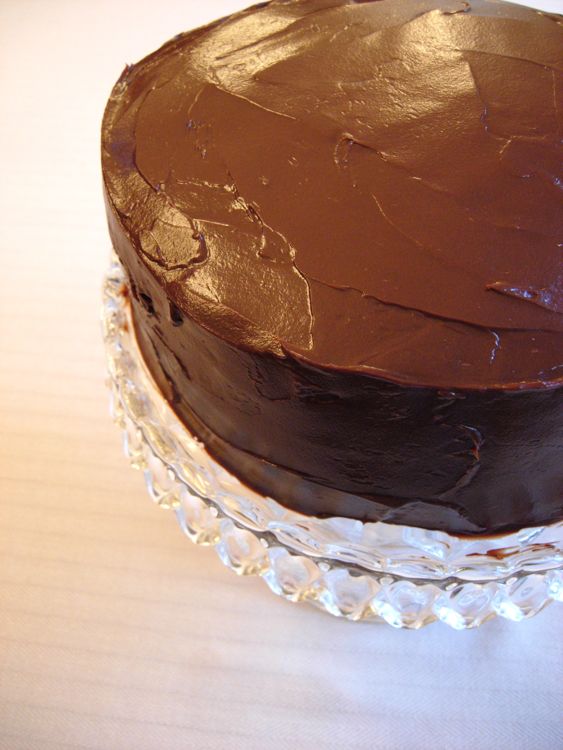
Celebrating Chocolate Cakes
Quite a few weeks back I spent most of an entire weekend baking celebration chocolate cakes. On Saturday a German Chocolate Cake for a graduation and on Sunday a Double Chocolate Layer Cake for Father's Day. These cake are variations of each other - one milk and one dark, yet with starkly different frostings. Both are wonderful recipes for whatever your celebration.

Milk Chocolate Cake with Coconut Pecan Frosting
This cake, also known as, German Chocolate Cake, is an American favorite (not a German one) whose name originated from its use of Baker’s German Sweet Chocolate in the recipe. What makes a German chocolate cake not a chocolate cake with a coconut pecan frosting, is the use of milk chocolate in its cake layers, and not semisweet or dark. When I walk into a bakery or cake shop and see layers of dark chocolate or devil’s food cake instead of milk chocolate in their “German Chocolate Cake,” it’s like nails against a chalkboard. It actually upsets me.
But when made correctly, moist milk chocolate cake layered between rich coconut pecan frosting is quite heavenly. I have been working on and looking for a good German Chocolate Cake for quite sometime now, and I have happily created a perfectly flavorful and tender milk chocolate cake to be layered between an adapted version of my Grandma’s recipe for Coconut Pecan Frosting. This recipe is scaled for a half sheet cake, which is perfect for serving a large crowd, but isn’t quite as attractive. See the cooking note below to alternatively make a 9 inch layer cake. Whatever size, a slice of this cake is the perfect choice to make any celebration a memorable one.


Makes 1 half sheet cake
Ingredients
Cake
3 cups all purpose flour
scant 1/2 cup cocoa powder (Green and Black’s)
2 teaspoons baking soda
1/2 teaspoon salt
12 oz. (3 sticks) unsalted butter, at room temperature
2 1/4 cups granulated sugar
6 eggs
6 ounces milk chocolate, chopped
1 tablespoon vanilla extract
1 1/2 cups buttermilk
Frosting
12 oz. (1 can) evaporated milk
6 ounces (1 1/2 sticks) unsalted butter
1 1/2 cups granulated sugar
pinch of salt
1 teaspoon vanilla
4 eggs
14 oz (1 package) sweetened flaked coconut
1 1/2 cups pecans, slightly toasted, chopped
Preheat the oven to 350 degrees F. Butter two half-sheet pans, and line the bottom of each with parchment paper. Set aside.
In a medium size bowl, sift together the flour, cocoa powder, baking soda and salt. Set aside.
Using a double boiler, or carefully using the microwave, melt the milk chocolate in a medium bowl. Set aside and let cool.
In a medium bowl fitted for an electric mixer, cream together the butter and sugar on medium/high speed until pale and fluffy. Add the eggs, one at a time, beating until each is incorporated, scraping down the sides of bowl as needed. Reduce the speed to low and add the melted chocolate and the vanilla extract. Add the flour mixture in two batches, alternating with the buttermilk; beating until combined after each addition.
Divide the batter evenly among the cake pans. Bake the cakes until a cake tester inserted in centers comes out clean, about 25 minutes. Do not over bake. Transfer the cake pans to wire racks and let cool.
Meanwhile, make the frosting. Heat the milk, butter and half of the sugar in a medium saucepan until almost simmering. Reduce the heat to low and add the vanilla and the salt. In a separate bowl combine the remaining sugar and the eggs. Whisk together well. (Do not allow the eggs and sugar to sit without being stirred, otherwise the sugar will cook the eggs.) Temper the egg mixture into the milk mixture. To do this, whisk the egg mixture and at the same time, pour a small amount (about 1/2 cup, 1 tablespoon at a time) of the hot milk mixture into the eggs. Then, return the pan with the remaining milk back to the stove. Whisk the warm milk, while slowly pouring the egg mixture into the warm milk. Cook the frosting over medium/low heat, while stirring, until thick, like a custard, about 10 minutes. Immediately pour the frosting through a sieve into a clean bowl. Stir in the coconut and the pecans. Set aside and let cool completely.
To assemble the cake, place one layer of the cake on a large plate or clean piece of cardboard wrapped in foil or paper. Remove the parchment paper. Spread half of the frosting evenly on the cake using an offset spatula. Carefully invert the second cake on top of the first. Frost with the remaining frosting. (You may also choose to frost the sides of this cake with chocolate ganache.) This cake is best, eaten the day it is made, but will keep up to 3 days in the refrigerator.
Cooking Note: To make a 9 inch cake, use 2 cups flour, 1/4 cup cocoa powder, 1 1/2 teaspoon baking soda, 1/4 teaspoon salt, 8 oz (2 sticks) unsalted butter, 1 1/2 sugar, 4 eggs, 4 oz chocolate, 1 1/2 teaspoons vanilla extract, 1 cup buttermilk for the cake and make in the exact same manner, but adjusting the cooking time to 20-25 minutes. However, the frosting does not need to be scaled down. Make the full recipe as follows and frost the sides of the cake if desired.
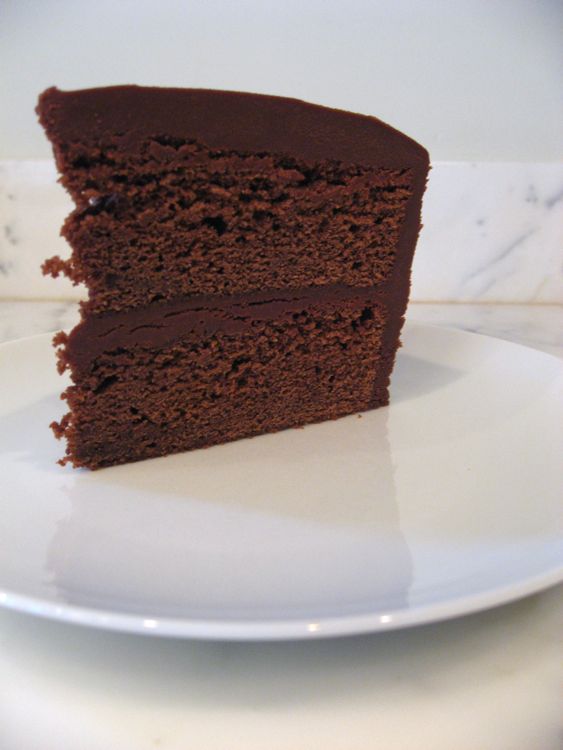
Double Chocolate Layer Cake with Rich Chocolate Frosting
Your classic chocolate cake.


Serves 12
Ingredients
Cake
2 cups all purpose flour
1/4 cup cocoa powder (Green and Black’s)
1 teaspoon baking soda
1 teaspoon salt
3 oz. dark chocolate (70%), chopped
1 oz. milk chocolate, chopped
1 cup (2 sticks) unsalted butter, room temperature
1 1/2 cups granulated sugar
4 eggs
1 teaspoon vanilla extract
1 cup buttermilk
Frosting
2 cups heavy cream
1 cup confectioner’s sugar
pinch of salt
1 1b. dark chocolate (65%), chopped
1 teaspoon vanilla extract
Preheat the oven to 350 degrees F. Butter two 9 inch cake pans. Line the bottom of each cake pan with parchment paper. Set aside.
In a medium size bowl, sift together the flour, cocoa powder, baking soda and salt. Set aside.
Using a double boiler, or carefully using the microwave, melt the dark and milk chocolate in a medium bowl. Set aside and let cool.
In a medium bowl fitted for an electric mixer, cream together the butter and sugar on medium/high speed until pale and fluffy. Add the eggs, one at a time, beating until each is incorporated, scraping down the sides of bowl as needed. Reduce the speed to low and add the melted chocolate and the vanilla extract. Add the flour mixture in two batches, alternating with the buttermilk; beating until combined after each addition.
Divide the batter evenly among the cake pans. Bake the cakes until a cake tester inserted in centers comes out clean, about 20-25 minutes. Transfer the cake pans to wire racks and let cool for 10 minutes. Carefully run a knife alongside the edges of the cake and the pan; then invert the cake onto a flat plate. Remove the parchment paper. Invert the cake back onto a wire rack to cool completely.
To make the frosting, heat the sugar and milk in a medium saucepan and bring to a simmer. Turn off the heat and add the salt, chocolate and vanilla extract. Let stand 1 minute, then stir until combined and smooth. Let the frosting cool 1-2 hours, stirring occasionally, until thick enough to frost the cake.
To assemble the cake, place one layer of the cake on a large cake plate or pedestal. Put about 2/3 cup frosting on the cake and use an offset spatula to evenly distribute the frosting. Place the second cake layer on top and use the remaining frosting on the top and sides of the cake. This cake is best, eaten the day it is made, when the cake is tender and light and the frosting is smooth and soft. Refrigerating the cake will cause the frosting to turn harder, more like the center of a truffle, which is also delicious, but entirely different.


Milk Chocolate Cake with Coconut Pecan Frosting
This cake, also known as, German Chocolate Cake, is an American favorite (not a German one) whose name originated from its use of Baker’s German Sweet Chocolate in the recipe. What makes a German chocolate cake not a chocolate cake with a coconut pecan frosting, is the use of milk chocolate in its cake layers, and not semisweet or dark. When I walk into a bakery or cake shop and see layers of dark chocolate or devil’s food cake instead of milk chocolate in their “German Chocolate Cake,” it’s like nails against a chalkboard. It actually upsets me.
But when made correctly, moist milk chocolate cake layered between rich coconut pecan frosting is quite heavenly. I have been working on and looking for a good German Chocolate Cake for quite sometime now, and I have happily created a perfectly flavorful and tender milk chocolate cake to be layered between an adapted version of my Grandma’s recipe for Coconut Pecan Frosting. This recipe is scaled for a half sheet cake, which is perfect for serving a large crowd, but isn’t quite as attractive. See the cooking note below to alternatively make a 9 inch layer cake. Whatever size, a slice of this cake is the perfect choice to make any celebration a memorable one.


Makes 1 half sheet cake
Ingredients
Cake
3 cups all purpose flour
scant 1/2 cup cocoa powder (Green and Black’s)
2 teaspoons baking soda
1/2 teaspoon salt
12 oz. (3 sticks) unsalted butter, at room temperature
2 1/4 cups granulated sugar
6 eggs
6 ounces milk chocolate, chopped
1 tablespoon vanilla extract
1 1/2 cups buttermilk
Frosting
12 oz. (1 can) evaporated milk
6 ounces (1 1/2 sticks) unsalted butter
1 1/2 cups granulated sugar
pinch of salt
1 teaspoon vanilla
4 eggs
14 oz (1 package) sweetened flaked coconut
1 1/2 cups pecans, slightly toasted, chopped
Preheat the oven to 350 degrees F. Butter two half-sheet pans, and line the bottom of each with parchment paper. Set aside.
In a medium size bowl, sift together the flour, cocoa powder, baking soda and salt. Set aside.
Using a double boiler, or carefully using the microwave, melt the milk chocolate in a medium bowl. Set aside and let cool.
In a medium bowl fitted for an electric mixer, cream together the butter and sugar on medium/high speed until pale and fluffy. Add the eggs, one at a time, beating until each is incorporated, scraping down the sides of bowl as needed. Reduce the speed to low and add the melted chocolate and the vanilla extract. Add the flour mixture in two batches, alternating with the buttermilk; beating until combined after each addition.
Divide the batter evenly among the cake pans. Bake the cakes until a cake tester inserted in centers comes out clean, about 25 minutes. Do not over bake. Transfer the cake pans to wire racks and let cool.
Meanwhile, make the frosting. Heat the milk, butter and half of the sugar in a medium saucepan until almost simmering. Reduce the heat to low and add the vanilla and the salt. In a separate bowl combine the remaining sugar and the eggs. Whisk together well. (Do not allow the eggs and sugar to sit without being stirred, otherwise the sugar will cook the eggs.) Temper the egg mixture into the milk mixture. To do this, whisk the egg mixture and at the same time, pour a small amount (about 1/2 cup, 1 tablespoon at a time) of the hot milk mixture into the eggs. Then, return the pan with the remaining milk back to the stove. Whisk the warm milk, while slowly pouring the egg mixture into the warm milk. Cook the frosting over medium/low heat, while stirring, until thick, like a custard, about 10 minutes. Immediately pour the frosting through a sieve into a clean bowl. Stir in the coconut and the pecans. Set aside and let cool completely.
To assemble the cake, place one layer of the cake on a large plate or clean piece of cardboard wrapped in foil or paper. Remove the parchment paper. Spread half of the frosting evenly on the cake using an offset spatula. Carefully invert the second cake on top of the first. Frost with the remaining frosting. (You may also choose to frost the sides of this cake with chocolate ganache.) This cake is best, eaten the day it is made, but will keep up to 3 days in the refrigerator.
Cooking Note: To make a 9 inch cake, use 2 cups flour, 1/4 cup cocoa powder, 1 1/2 teaspoon baking soda, 1/4 teaspoon salt, 8 oz (2 sticks) unsalted butter, 1 1/2 sugar, 4 eggs, 4 oz chocolate, 1 1/2 teaspoons vanilla extract, 1 cup buttermilk for the cake and make in the exact same manner, but adjusting the cooking time to 20-25 minutes. However, the frosting does not need to be scaled down. Make the full recipe as follows and frost the sides of the cake if desired.
Double Chocolate Layer Cake with Rich Chocolate Frosting
Your classic chocolate cake.
Serves 12
Ingredients
Cake
2 cups all purpose flour
1/4 cup cocoa powder (Green and Black’s)
1 teaspoon baking soda
1 teaspoon salt
3 oz. dark chocolate (70%), chopped
1 oz. milk chocolate, chopped
1 cup (2 sticks) unsalted butter, room temperature
1 1/2 cups granulated sugar
4 eggs
1 teaspoon vanilla extract
1 cup buttermilk
Frosting
2 cups heavy cream
1 cup confectioner’s sugar
pinch of salt
1 1b. dark chocolate (65%), chopped
1 teaspoon vanilla extract
Preheat the oven to 350 degrees F. Butter two 9 inch cake pans. Line the bottom of each cake pan with parchment paper. Set aside.
In a medium size bowl, sift together the flour, cocoa powder, baking soda and salt. Set aside.
Using a double boiler, or carefully using the microwave, melt the dark and milk chocolate in a medium bowl. Set aside and let cool.
In a medium bowl fitted for an electric mixer, cream together the butter and sugar on medium/high speed until pale and fluffy. Add the eggs, one at a time, beating until each is incorporated, scraping down the sides of bowl as needed. Reduce the speed to low and add the melted chocolate and the vanilla extract. Add the flour mixture in two batches, alternating with the buttermilk; beating until combined after each addition.
Divide the batter evenly among the cake pans. Bake the cakes until a cake tester inserted in centers comes out clean, about 20-25 minutes. Transfer the cake pans to wire racks and let cool for 10 minutes. Carefully run a knife alongside the edges of the cake and the pan; then invert the cake onto a flat plate. Remove the parchment paper. Invert the cake back onto a wire rack to cool completely.
To make the frosting, heat the sugar and milk in a medium saucepan and bring to a simmer. Turn off the heat and add the salt, chocolate and vanilla extract. Let stand 1 minute, then stir until combined and smooth. Let the frosting cool 1-2 hours, stirring occasionally, until thick enough to frost the cake.
To assemble the cake, place one layer of the cake on a large cake plate or pedestal. Put about 2/3 cup frosting on the cake and use an offset spatula to evenly distribute the frosting. Place the second cake layer on top and use the remaining frosting on the top and sides of the cake. This cake is best, eaten the day it is made, when the cake is tender and light and the frosting is smooth and soft. Refrigerating the cake will cause the frosting to turn harder, more like the center of a truffle, which is also delicious, but entirely different.

Tuesday, June 8, 2010
A Quick and Easy Dessert

Chocolate Chunk Oatmeal Blondies
These bars are chewy and loaded with oatmeal and chocolate chunks, and can become quite addicting. I think these bars will make the perfect dessert to take to your upcoming summer barbecues, as they are quick and stress-free to make, cut easily and clean, and stack and transport well.
Makes 24
Ingredients
- 3/4 cup (12 tablespoons) unsalted butter, at room temperature
- 1 cup packed brown sugar
- 1/3 cup sugar
- 1 teaspoon vanilla extract
- 2 eggs
- 2 cups all purpose flour
- 2 teaspoons baking powder
- 1 teaspoon salt
- 1 1/3 cups oatmeal
- 1 1/2 cups chocolate chips/chunks (semi-sweet, dark, milk)
Preheat the oven to 350 degrees F. Butter a 9 by 13 inch baking dish and line the bottom with parchment paper. In a large bowl, cream together the butter and sugars. Add the vanilla extract and the eggs, one at a time. Add the flour, salt and baking powder and gently stir everything together. Add the oats and chocolate chunks. Use a spatula to evenly spread the dough into the baking dish. Bake for 35-40 minutes, until light brown on the edges. Let cool completely. Cut into squares. These bars will keep in an airtight container for up to 3 days.

Saturday, February 13, 2010
Chocolate Candies for Valentine's Day
Okay, one more sweet treat before Valentine's Day - my Milk Chocolate Peanut Butter Patties. A box of these homemade chocolates would make the perfect Valentine's Day gift, don't you think?

Chocolate Peanut Butter Patties
These homemade peanut butter patties are very easy to make, since I skip the step of tempering my chocolate. Of course, you can temper the chocolate properly if you would like (a process that involves melting the chocolate and bringing it to exactly 45 degrees C, then cooling to exactly 25 degrees C, then reheating back up to 30 degrees C), but I am a bit lazy when it comes to tempering chocolate. Instead I am using a method called direct warming, which means that you bring the chocolate to the exact final temperature. In the case of the milk chocolate used here, that temperature is 30 degrees or 86 degrees F. Tempering chocolate properly is essential in chocolate making because it ensures that the chocolate will have a smooth and glossy finish. Untempered chocolate will not set completely and leave you with melty mess, and more than likely it will bloom, (the process in which cocoa butter arises to the surface of the chocolate and re-crystallizes) giving you a white coating all over the surface of the chocolate. Bloomed chocolate certainly won’t hurt you or take away any flavor – it just isn’t all that attractive to have white mold-like spots on your candy.
With that said, I still decide to skip the tempering step since I am not so terribly concerned with these homemade confections looking perfect, and they will likely get gobbled up before they even have the chance to bloom. Plus, I dust them with roasted peanuts, just in case my quick and dirty method doesn’t pull through. So I leave the choice to temper the chocolate up to you.

Makes approximately 15 chocolates
Ingredients
1/3 cup creamy organic peanut butter
1 teaspoon butter, soft
pinch of salt
1 tablespoon cream
scant 1/2 cup confectioner’s sugar, sifted
6 ounces milk chocolate
1/4 cup roasted and salted peanuts, finely chopped
To make the peanut butter filling combine the peanut butter, butter and salt. Add the confectioner’s sugar and stir until combined. Finally, stir in the cream. Scoop out approximately a half-tablespoon of peanut butter filling and roll in the palm of your hands; then press down slightly with your fingertips to create a disk. Place the peanut butter patties on a piece of wax or parchment paper.
Meanwhile, heat the milk chocolate in a small saucepan (or over a bain marie) over low heat, while stirring. When the chocolate is almost melted, remove from the heat and continue to stir, until completely melted. (If using a candy thermometer, bring the chocolate to 30 degrees C or 86 degrees F.)
Dip one peanut butter patty in the milk chocolate. Use a fork to pick up the patty and let the chocolate drip off the bottom of the patty; then place on a clean sheet of wax/parchment paper. Top the chocolate with a pinch of chopped peanuts. Repeat the same process. Let cool completely.

Wednesday, February 3, 2010
For Valentine's Day
Double Dark Chocolate Chunk Cookies
Chocolate Cookie Blackberry Ice Cream Sandwhiches


When I think of Valentine's Day I think of two things - chocolate and more chocolate.
So, with the upcoming holiday I thought it would be very appropriate to share my recipe for my Double Dark Chocolate Chunk Cookies. These dark chocolate cookies are for serious chocolate lovers only. They are rich and decadent and unlike many drop cookies they are best the day after they are made, not warm out of the oven.
In the summertime I use these cookies as the base for my Chocolate Cookie Blackberry Ice Cream Sandwiches. However the combination of rich dark chocolate and sweet blackberry ice cream would also make a perfect Valentine's Day treat.
Double Chocolate Chunk Cookies

Makes 2 dozen cookies
Ingredients
8 ounces bittersweet chocolate (60-68%), chopped
4 tablespoons unsalted butter, soft
1/2 cup all purpose flour
2 Tablespoons unsweetened cocoa powder
1/2 teaspoon baking powder
1/2 teaspoon salt
2 large eggs
3/4 cup packed brown sugar
1 teaspoon vanilla extract
8 oz semi sweet chocolate bar, cut into 1/4 inch chunks
Preheat the oven to 350 degrees F. Line two baking sheets with parchment paper. Melt the chocolate and butter in a double boiler or slowly in the microwave, being careful not to burn the chocolate or clarify the butter. Set the chocolate/butter mixture aside to cool.
Meanwhile, sift together the flour, cocoa powder, baking powder and salt. Set aside.
In a mixing bowl fitter for an electric mixer with a paddle attachment, beat the eggs and brown sugar on high speed until light and fluffy, about 3-4 minutes. Add the chocolate mixture and the vanilla extract and mix until combined. Gently fold in the dry ingredients. Finally, gently fold in the chocolate chunks. (Note: This cookie dough needs to baked immediately and cannot be made a head of time. It is best to scoop out the cookie dough as soon as possible, since the dough hardens and looses its gloss as it sits.)
Place 2 tablespoons of the cookie dough on the prepared baking sheets about 2 inches apart. Bake the cookies for 12-15, minutes depending on the size of the cookies. The tops should be slightly cracked but not firm to the touch. Remove the cookies form the oven and allow the cookies to cool on the baking sheet for 1 minutes; then transfer to a wire rack to cool. Serve warm or at room temperature. These cookies will keep in an airtight container for up to 3 days.
Chocolate Cookie Blackberry Ice Cream Sandwiches
Creamy blackberry ice cream compliments these cookies well, however I have tried many different types of ice cream with these cookies including vanilla, mint, coffee and peanut butter. Personally I have found that the stronger flavors, like mint, coffee and peanut butter overwhelm the dark chocolate flavor of the cookie. My favorites are vanilla and blackberry.

To make ice cream sandwiches freeze the cookies unstacked on a plate for 30 minutes. Take one frozen cookie and place face down. Place a scoop of ice cream on top of the cookie and then place a second cookie on top of the ice cream. Gently press the cookies together. (Tip: I use a small angled spatula to even out the ice cream.) Working quickly, wrap the ice cream sandwich in plastic wrap or parchment paper and return to the freezer for at least 2 hours, until ready to serve.

Sunday, January 3, 2010
American Comfort Food
Sweet Potato Fries
Grandma's Macaroni and Cheese
Roasted Asparagus
Chocolate Bread Pudding with Warm Creme Anglaise


Sweet Potato Fries
Serve with Pommes Frites al Forno Dipping Sauces (September 8, 2009 blog entry).

Serves 4
Ingredients
- 2 large sweet potatoes
- coarse salt
- about 1/4 cup olive oil/vegetable oil
Preheat your oven to 425 degrees F. Cover 2 large sheet pans with parchment paper. Peel the potatoes and immediately place in a large bowl of water. With a sharp knife, cut each potato in half and then into 1/8 of an inch strips. Cut each strip into1/8 inch thick pieces, so that you have long, skinny potato slices. If the potatoes start to turn brown, place them in a large bowl filled with cold water. Place the potatoes on the sheet pans spread evenly apart and toss with oil and salt. After 15 minutes flip the fries using a large metal spatula. Bake until crisp and golden brown, about 30 minutes.
Grandma’s Macaroni and Cheese
I have certainly had (either made or eaten) my fair share of macaroni and cheese, and though I have had some good ones nothing beats my Grandma’s classic recipe. I have had macaroni and cheese with fancy noodles, exotic cheeses, breadcrumb topping, sliced tomatoes, and unnecessary foreign ingredients and still my all time favorite is my Grandma’s well-loved recipe. What makes this macaroni and cheese dish amazing is taking the extra effort to find really good extra sharp cheddar cheese. I suggest opting out of the artificial processed kind by going to a gourmet cheese shop.
 Serves 6
Ingredients
- 1 pound elbow pasta, or any medium size macaroni shape noodle
- 1/2 cup extra sharp cheddar cheese, graded
- 1 cup soda cracker crumbs
Cheese Sauce
- 8 tablespoons butter
- 6-8 tablespoons flour
- 4 cup milk (you can use 1%, 2% or whole milk)
- 1 teaspoon salt, plus more for seasoning
- pinch of pepper
- 4 cups ( about 16 ounces) extra sharp cheddar cheese, grated

Bring a large pot of salted water to a boil. Set aside a large casserole dish with a lid, and preheat your oven to 350 degrees F. Meanwhile, melt the butter on low heat in a medium size heavy saucepan. Add just enough flour to the butter to make a paste. Slowly stir in the milk to the paste. Continue to stir and cook over low/medium heat until the sauce has thickened. Add the salt and pepper. Turn the heat off and stir in the cheese until melted. When the salted water has come to a boil cook the pasta 2 minutes less than the package’s cooking instructions call for. (The pasta will finish cooking in the oven.) Drain the pasta and add to the casserole dish, and combine with the cheese sauce. Toss the noodles evenly with the sauce and taste for more salt. Sprinkle the remaining half cup of cheese on top of the macaroni and sprinkle the cracker crumbs on top of the cheese. Bake, with a lid, for 20 minutes. Remove the lid and bake for 10 minutes more. Serve warm.
Roasted Asparagus
If you haven’t had asparagus roasted… well, you should.
Preheat the oven to 400 degrees F. Trim the ends of the asparagus and place on a baking sheet. Toss the asparagus with a bit of olive oil, salt and pepper. Roast in the oven for 20 minutes. Serve immediately.
Chocolate Bread Pudding with Warm Crème Anglaise
This dessert is the epitome of comfort- warm, gooey, chocolaty and covered with vanilla crème anglaise…mmm… Though there is nothing exotic about this dessert, the classic duality of chocolate and vanilla proves itself again. This bread pudding is ridiculously easy to make and goes down pretty easily too, since it is not nearly as rich and indulgent as it looks. It is also surprisingly less sweet than one would expect and therefore needs the balance of the crème anglaise. Enjoy.

Serves 10-12
Ingredients
- butter for baking dish
- 1 pound challah bread, cut into 1/2 cubes
- 4 cups milk
- 8 ounces semisweet chocolate
- 6 large eggs
- 3/4 cup granulated sugar
- pinch of salt
- 1/2 teaspoon vanilla bean extract or vanilla extract
Chocolate Ganache
- 4 ounces semisweet or dark chocolate, finely chopped
- 1 cup cream
Preheat the oven to 350 degrees. Lightly butter a 13 by 9 baking dish. Set aside. Spread the bread cubes out on a large baking sheet and toast in the oven for 15 minutes. Let cool.
In a medium saucepan, heat the milk, butter and vanilla on medium-low heat until warm. Add the chopped chocolate and stir until chocolate has melted. Then add the sugar and let for a few minutes. Meanwhile, in a medium bowl, whisk together the eggs Slowly whisk the eggs into the warm chocolate milk mixture.
Place the cooled toasted bread cubes evenly in a large bowl and evenly pour the custard over the bread cubes. Let the bread cubes absorb the custard for 30 to 45 minutes.
To make the ganache, heat the cream in a small saucepan and bring to a simmer. Pour the hot cream over the chopped chocolate in 3 additions and stir until smooth. Let the ganache cool for 15 minutes.
Transfer half of the soaked bread cubes into the prepared baking dish. Pour over half of the ganache. Top with the remaining breadcrumbs. Pour the remaining ganache over the top. Bake the pudding until it is puffed and does not giggle in the center, when lightly shook, about 55 minutes to 1 hour. Remove the bread pudding from the oven and let sit 10 minutes. Serve warm or at room temperature with Warm Crème Anglaise.
Warm Crème Anglaise
Ingredients
- 1/2 cup whole milk
- 1/2 cup heavy cream
- 3 egg yolks
- 1/2 vanilla bean, or 1 teaspoon vanilla bean paste
- 3 tablespoons sugar
To make the sauce heat the milk, cream and half of the sugar in a medium size heavy saucepan. Cut the vanilla bean lengthwise and use the tip of the knife to scrape all of the seeds into the milk. Place the vanilla bean in the milk and bring to a simmer. In a small bowl whisk together the egg yolks and the remaining sugar. When the milk is at a simmer, slowly pour a few tablespoon of the hot milk into the eggs, while whisking. Add a few tablespoons more of hot milk; then return the saucepan to the stove over low heat.
While whisking the hot milk, gradually pour the egg mixture back into the milk on the stove. Use a heatproof spatula to continuously stir the sauce until it begins to thicken, or until it can coat the back of spoon. When the sauce is thick (and reaches 82 C/182 F, if you have a digital thermometer), pour the sauce into a strainer over a medium size clean bowl. Serve warm over the chocolate bread pudding.
Friday, November 27, 2009
Thankful For Dessert

Honey Pecan Tart with Milk Chocolate Ganache
Ingredients
Shortbread Crust (makes 2 crusts)
- 12 tablespoons unsalted butter, at room temperature
- 3/4 cup sugar
- 1 tablespoon vanilla extract
- 3 egg yolks
- 3 cups flour
Filling
- 3 tablespoons unsalted butter
- 1/2 cup brown sugar
- 1/2 cup honey
- pinch of salt teaspoon salt
- 1 teaspoon vanilla extract
- 2 eggs
- 2 cups pecan half, toasted, roughly chopped
 To make the crust combine the butter and sugar in a medium size bowl. Stir in the egg yolk and vanilla extract. Add the flour and salt and mix until just combined. Press the mixture into a buttered 10 inch tart pan and refrigerate overnight or freeze for 20 minutes. Preheat the oven to 375 degrees F and bake the tart crust for 15 minutes. Let cool completely.
Meanwhile, to make the filling, combine the butter, brown sugar and honey in a medium saucepan over medium heat. Bring just to a boil; then add the salt and vanilla. Set aside and let cool for 20-30 minutes until thick. Should still be warm.
Meanwhile, in a large bowl whisk the eggs. Pour in the cooled sugar mixture until combined. Gently stir in the pecans.
Preheat the oven to 375 degrees F. Pour the filling into the prepared tart pan and place in the oven. Place a pie crust ring or foil over the tart crust edges. Bake for 25-30 minutes or until the tart is golden brown and cooked in the center. Let cool completely on a wire rack. Slice the tart with a sharp knife. Drizzle individual slices with warm Milk Chocolate Ganache (recipe follows) if desired.
 Milk Chocolate Ganache
In a small saucepan combine chopped milk chocolate (about 1/2 cup) and cream (about 2 tablespoons). Stir over low heat until melted and combined. If the ganache is too thick add another tablespoon or so of cream. If the ganache is too thin add a bit more chocolate.
Tuesday, October 6, 2009
Cookie Jar
A slight twist on a few classics.
Milk Chocolate Chip Cookies with Sea Salt
Brown Sugar Oatmeal Golden Raisin Cookies
Peanut Butter and Grape Jelly Thumbprints

Milk Chocolate Chip Cookies with Sea Salt
I have made dozens of chocolate chip cookie recipes in search of the perfect one. To me perfection is: a soft and dense cookie (slightly undercooked) in the middle, and a bit chewy on the outer rim, rather than a flat, crisp cookie or a soft, cakey cookie. These chocolate chip cookies are not quite perfect, but are pretty darn close. A final condition for a perfect chocolate chip cookie is that it is loaded with chocolate chips. In this recipe I use milk chocolate chips, and top each cookie with a small pinch of sea salt, which really compliments the sweetness of the milk chocolate. However, this recipe is a great chocolate chip cookie base and certainly semi-sweet or dark chocolate can be substituted for some of the milk chocolate. I like to mix it up and use different types of chocolates, sometimes chunks and sometimes chips. Regardless, there is nothing better than a plate of warm chocolate chip cookies right out of the oven.

Makes 4 dozen cookies
Ingredients
- 1 1/4 cups unsalted butter, at room temperature
- 1 3/4 cups packed brown sugar
- 1/2 cup granulated sugar
- 2 eggs
- 1 teaspoon vanilla extract
- 17 ounces all purpose flour
- 1/2 teaspoon salt
- 1 teaspoon baking soda
- 1 1/2 teaspoon baking powder
- 21 ounces good quality milk chocolate chips or milk chocolate, chopped
- sea salt

Preheat the oven to 350 degrees F.
In a medium sized bowl sift together the flour, baking soda, baking powder and salt. Set aside.
In a large bowl, cream together the butter and sugars. Add the eggs and the vanilla extract to the butter and sugar mixture, and combine together. Gently stir in the flour mixture until just combined. Finally, stir in the chocolate chips. At this point, the dough can be refrigerate for up to 2 days, or frozen for up to 3 months.
Spoon out about 2 tablespoons of cookie dough and form into a round ball. Place the ball of dough down onto an ungreased cookie sheet and slightly press the center of the cookie. Repeat this process, placing cookies 1 inch apart from one another. Top each cookie with a pinch of sea salt. Bake in the oven for about 10-12 minutes or until the edges are light golden brown. (I prefer cookies that are slightly under baked.) When the cookies are done baking the top should start to turn slightly golden, but the cookies should still seem soft and not quite cooked through in the center. Take the baking sheet out of the oven and let the cookies cool on the baking sheet for 2 minutes. Transfer the cookies to a wire rack to cool completely (or eat warm). Store in an airtight container for up to 3 days.
Brown Sugar Oatmeal Golden Raisin Cookies
Crisp, chewy, buttery and loaded with oats. The subtle sweetness of plump golden raisins are really delicious in this cookie, and surprisingly taste very different from their purple cousins.

Make 2 dozen cookies
Ingredients
- 1 1/2 cups all purpose flour
- 1/2 teaspoon salt
- 1 teaspoon ground cinnamon
- 1 1/2 teaspoon baking soda
- 8 ounces (2 sticks) unsalted butter, at room temperature
- 1 1/4 cup packed brown sugar
- 2/3 cup granulated sugar
- 2 eggs
- 1 teaspoon vanilla extract
- 1 1/2 cups old fashion oats
- 1 1/2 cups quick cooking oats
- 1 3/4 cups golden raisins
Preheat the oven to 350 degrees F.
In a large bowl sift together the flour, salt, cinnamon, and baking soda. Set aside.
In a large mixing bowl cream together the butter with brown sugar and granulated sugar, until light and fluffy. Add the eggs, one at a time, mixing after each addition. Add the vanilla extract and mix until combined. Gently stir in the dry ingredients. Finally, stir in the oats and raisins.
Drop tablespoon size balls of cookie dough onto unlined baking sheets 2 inches apart and bake for 10-13 minutes or until the cookies are light golden brown on the edges. (I prefer to slightly under bake these cookies so they or soft. You can bake the cookies until golden for a crispier cookie.) Remove the pan from the oven and let the cookies cool on the pan for 1 minute and then transfer the cookies to a wire rack to cool. Store the cool cookies in an airtight container for up to 2 days. This dough will also keep wrapped with plastic wrap in the refrigerator for up to 2 days before baking.
Peanut Butter and Grape Jelly Thumbprints
These cookies are similar to, yet better than, eating a peanut butter and jelly sandwich. They can also be quite addicting.

Make 40 cookies
Ingredients
- 1/2 cup (1 stick) unsalted butter
- 3/4 cup brown sugar
- 1/4 cup granulated sugar, plus more for coating
- 1/2 cup creamy natural peanut butter
- 1 egg
- 1 teaspoon vanilla extract
- 1 3/4 cups all purpose flour
- 1 teaspoon baking soda
- 1/4 teaspoon salt
- 1/2 cup grape jelly

Preheat the oven to 375 degrees F. Place about 1/2 cup granulated sugar in a bowl and set aside.
In a large bowl sift together the flour, salt, baking powder and baking soda. Set aside.
In a large mixing bowl cream together the butter with brown sugar and granulated sugar, until light and fluffy. Add the egg and the vanilla extract and mix until combined. Stir in the peanut butter. Gently stir in the dry ingredients.
Use your hands to create a tablespoon size ball of dough. Drop the ball of dough into the bowl with the granulated sugar and coat completely. Place the sugared cookie dough onto unlined baking sheets, and repeat this process, placing the cookies approximately 2 inches apart. Gently press your finger in the center of each unbaked cookie to create a small well. Place approximately 1/3 teaspoon of the jelly in each well. Bake for 9-11 minutes or until the cookies are light golden brown on the edges. Remove the pan from the oven and let the cookies cool on the pan for 1 minute and then transfer the cookies to a wire rack to cool. Store the cool cookies in an airtight container for up to 2 days. This dough will also keep wrapped with plastic wrap in the refrigerator for up to 2 days before baking.
Milk Chocolate Chip Cookies with Sea Salt
Brown Sugar Oatmeal Golden Raisin Cookies
Peanut Butter and Grape Jelly Thumbprints

Milk Chocolate Chip Cookies with Sea Salt
I have made dozens of chocolate chip cookie recipes in search of the perfect one. To me perfection is: a soft and dense cookie (slightly undercooked) in the middle, and a bit chewy on the outer rim, rather than a flat, crisp cookie or a soft, cakey cookie. These chocolate chip cookies are not quite perfect, but are pretty darn close. A final condition for a perfect chocolate chip cookie is that it is loaded with chocolate chips. In this recipe I use milk chocolate chips, and top each cookie with a small pinch of sea salt, which really compliments the sweetness of the milk chocolate. However, this recipe is a great chocolate chip cookie base and certainly semi-sweet or dark chocolate can be substituted for some of the milk chocolate. I like to mix it up and use different types of chocolates, sometimes chunks and sometimes chips. Regardless, there is nothing better than a plate of warm chocolate chip cookies right out of the oven.

Makes 4 dozen cookies
Ingredients
- 1 1/4 cups unsalted butter, at room temperature
- 1 3/4 cups packed brown sugar
- 1/2 cup granulated sugar
- 2 eggs
- 1 teaspoon vanilla extract
- 17 ounces all purpose flour
- 1/2 teaspoon salt
- 1 teaspoon baking soda
- 1 1/2 teaspoon baking powder
- 21 ounces good quality milk chocolate chips or milk chocolate, chopped
- sea salt

Preheat the oven to 350 degrees F.
In a medium sized bowl sift together the flour, baking soda, baking powder and salt. Set aside.
In a large bowl, cream together the butter and sugars. Add the eggs and the vanilla extract to the butter and sugar mixture, and combine together. Gently stir in the flour mixture until just combined. Finally, stir in the chocolate chips. At this point, the dough can be refrigerate for up to 2 days, or frozen for up to 3 months.
Spoon out about 2 tablespoons of cookie dough and form into a round ball. Place the ball of dough down onto an ungreased cookie sheet and slightly press the center of the cookie. Repeat this process, placing cookies 1 inch apart from one another. Top each cookie with a pinch of sea salt. Bake in the oven for about 10-12 minutes or until the edges are light golden brown. (I prefer cookies that are slightly under baked.) When the cookies are done baking the top should start to turn slightly golden, but the cookies should still seem soft and not quite cooked through in the center. Take the baking sheet out of the oven and let the cookies cool on the baking sheet for 2 minutes. Transfer the cookies to a wire rack to cool completely (or eat warm). Store in an airtight container for up to 3 days.
Brown Sugar Oatmeal Golden Raisin Cookies
Crisp, chewy, buttery and loaded with oats. The subtle sweetness of plump golden raisins are really delicious in this cookie, and surprisingly taste very different from their purple cousins.

Make 2 dozen cookies
Ingredients
- 1 1/2 cups all purpose flour
- 1/2 teaspoon salt
- 1 teaspoon ground cinnamon
- 1 1/2 teaspoon baking soda
- 8 ounces (2 sticks) unsalted butter, at room temperature
- 1 1/4 cup packed brown sugar
- 2/3 cup granulated sugar
- 2 eggs
- 1 teaspoon vanilla extract
- 1 1/2 cups old fashion oats
- 1 1/2 cups quick cooking oats
- 1 3/4 cups golden raisins
Preheat the oven to 350 degrees F.
In a large bowl sift together the flour, salt, cinnamon, and baking soda. Set aside.
In a large mixing bowl cream together the butter with brown sugar and granulated sugar, until light and fluffy. Add the eggs, one at a time, mixing after each addition. Add the vanilla extract and mix until combined. Gently stir in the dry ingredients. Finally, stir in the oats and raisins.
Drop tablespoon size balls of cookie dough onto unlined baking sheets 2 inches apart and bake for 10-13 minutes or until the cookies are light golden brown on the edges. (I prefer to slightly under bake these cookies so they or soft. You can bake the cookies until golden for a crispier cookie.) Remove the pan from the oven and let the cookies cool on the pan for 1 minute and then transfer the cookies to a wire rack to cool. Store the cool cookies in an airtight container for up to 2 days. This dough will also keep wrapped with plastic wrap in the refrigerator for up to 2 days before baking.
Peanut Butter and Grape Jelly Thumbprints
These cookies are similar to, yet better than, eating a peanut butter and jelly sandwich. They can also be quite addicting.

Make 40 cookies
Ingredients
- 1/2 cup (1 stick) unsalted butter
- 3/4 cup brown sugar
- 1/4 cup granulated sugar, plus more for coating
- 1/2 cup creamy natural peanut butter
- 1 egg
- 1 teaspoon vanilla extract
- 1 3/4 cups all purpose flour
- 1 teaspoon baking soda
- 1/4 teaspoon salt
- 1/2 cup grape jelly

Preheat the oven to 375 degrees F. Place about 1/2 cup granulated sugar in a bowl and set aside.
In a large bowl sift together the flour, salt, baking powder and baking soda. Set aside.
In a large mixing bowl cream together the butter with brown sugar and granulated sugar, until light and fluffy. Add the egg and the vanilla extract and mix until combined. Stir in the peanut butter. Gently stir in the dry ingredients.
Use your hands to create a tablespoon size ball of dough. Drop the ball of dough into the bowl with the granulated sugar and coat completely. Place the sugared cookie dough onto unlined baking sheets, and repeat this process, placing the cookies approximately 2 inches apart. Gently press your finger in the center of each unbaked cookie to create a small well. Place approximately 1/3 teaspoon of the jelly in each well. Bake for 9-11 minutes or until the cookies are light golden brown on the edges. Remove the pan from the oven and let the cookies cool on the pan for 1 minute and then transfer the cookies to a wire rack to cool. Store the cool cookies in an airtight container for up to 2 days. This dough will also keep wrapped with plastic wrap in the refrigerator for up to 2 days before baking.
Thursday, September 17, 2009
Better than a Pudding Pack
Double Chocolate Pudding with Hand-Whipped Cream
Vanilla Bean Orange Scented Shortbread Cookies

Double Chocolate Pudding with Hand-Whipped Cream
This chocolate pudding is rich, creamy and very chocolatey, and not overtly sweet. I very much recommend serving this pudding with sweetened whipped cream, to balance out the richness and flavors of this cold chocolate dessert. This pudding is very versatile - it can be served as an elegant, yet understated, dessert or in stark contrast to a group of kids, who I imagine would enjoy this incredibly better version of the store bought chocolate pudding cups. Here I served the chocolate pudding in glass parfait dishes, topped with hand-whipped cream and chocolate shavings. Though certainly not necessary (but makes a wonderful compliment), I served this velvety pudding alongside a plate of crisp Orange Scented Shortbread Cookies. This pudding would also be an excellent base for a homey chocolate cream pie.
Serves 10
Pudding Ingredients
- 4 cups whole milk (or 3 cups low fat milk and 1 cup heavy cream)
- 4 tablespoons cornstarch
- 1/2 cup granulated sugar
- pinch of salt
- 1/2 cup unsweetened cocoa powder
- 6 ounces good quality dark chocolate, finely chopped, plus 1 tablespoon for garnish
- 2 ounces good quality milk chocolate, finely chopped
- 2 tablespoons unsalted butter
In a heavy medium size saucepan, whisk together the cornstarch, sugar, cocoa powder and pinch of salt. While whisking, slowly pour in the milk. Over medium heat, bring the mixture to a boil while whisking constantly, until thickened. It will take about 3-4 minutes, after the pudding has come to a boil. Remove the pan from the heat and add the chopped chocolate and butter. Transfer the pudding into 10 individual cups or 1 large serving bowl and cover the top surface of the pudding with plastic wrap to prevent a skin from forming. Chill in the refrigerator for at least 1 hour before serving. When ready to serve, top each pudding with a dollop (or two) of the Hand Whipped Cream and top with fresh chocolate shavings. The pudding (without the whipped cream) will last covered in the refrigerator for up 4 days.

Hand-Whipped Cream Ingredients
- 1 cup heavy cream
- 2 heaping tablespoons confectioner’s sugar
- 1/2 teaspoon vanilla or vanilla bean extract
Pour the cold heavy cream into a large bowl. Stir in the vanilla bean and confectioner’s sugar until dissolved. Use a large balloon whisk to whip the cream until soft peaks form. Do not over whip. Serve immediately or keep in the refrigerator until ready to serve for no longer than 3 hours.

Vanilla Bean Orange Scented Shortbread Cookies
Cooking Note: It is best to bake cookies that are approximately the same size to ensure even cooking. If you do not have vanilla bean paste or fresh vanilla bean, you can certainly substitute vanilla extract.
Makes approximately 18 cookies
Ingredients
- 6 ounces unsalted butter, room temperature
- 1/2 cup sugar, plus 2 tablespoons for sprinkling
- 1/2 teaspoon vanilla bean paste
- 1/2 teaspoon finely grated orange zest
- 1 3/4 cups all purpose flour
- pinch of salt
In a large bowl cream (either by hand or with an electric mixer) the butter and sugar until combined. Add in the vanilla bean paste and orange zest. Sift the flour and salt over the butter and sugar mixture. Gently stir in flour into the dough until just combined. Place the dough on a lightly floured work surface and gently pat into a ball. Chill for 30 minutes to 1 hour in the refrigerator.
Preheat the oven to 350 degrees F. On the lightly floured work surface, roll the dough to 1/2 inch thick. Use a cookie cutter to press out cookie shapes and place on to an ungreased cookie sheet. Sprinkle the cookies with reserved sugar. Refrigerate the cookies on the sheet pan for approximately 10 minutes before baking. Bake the cookies for 15-17 minutes, depending on the size of the cookies, or until the edges are light golden brown. Let the cookies cool on the cookie sheet for 1 minutes, then transfer to a wire rack to cook completely. These cookies will keep in an airtight container for up to 3 days.


Vanilla Bean Orange Scented Shortbread Cookies

Double Chocolate Pudding with Hand-Whipped Cream
This chocolate pudding is rich, creamy and very chocolatey, and not overtly sweet. I very much recommend serving this pudding with sweetened whipped cream, to balance out the richness and flavors of this cold chocolate dessert. This pudding is very versatile - it can be served as an elegant, yet understated, dessert or in stark contrast to a group of kids, who I imagine would enjoy this incredibly better version of the store bought chocolate pudding cups. Here I served the chocolate pudding in glass parfait dishes, topped with hand-whipped cream and chocolate shavings. Though certainly not necessary (but makes a wonderful compliment), I served this velvety pudding alongside a plate of crisp Orange Scented Shortbread Cookies. This pudding would also be an excellent base for a homey chocolate cream pie.
Serves 10
Pudding Ingredients
- 4 cups whole milk (or 3 cups low fat milk and 1 cup heavy cream)
- 4 tablespoons cornstarch
- 1/2 cup granulated sugar
- pinch of salt
- 1/2 cup unsweetened cocoa powder
- 6 ounces good quality dark chocolate, finely chopped, plus 1 tablespoon for garnish
- 2 ounces good quality milk chocolate, finely chopped
- 2 tablespoons unsalted butter
In a heavy medium size saucepan, whisk together the cornstarch, sugar, cocoa powder and pinch of salt. While whisking, slowly pour in the milk. Over medium heat, bring the mixture to a boil while whisking constantly, until thickened. It will take about 3-4 minutes, after the pudding has come to a boil. Remove the pan from the heat and add the chopped chocolate and butter. Transfer the pudding into 10 individual cups or 1 large serving bowl and cover the top surface of the pudding with plastic wrap to prevent a skin from forming. Chill in the refrigerator for at least 1 hour before serving. When ready to serve, top each pudding with a dollop (or two) of the Hand Whipped Cream and top with fresh chocolate shavings. The pudding (without the whipped cream) will last covered in the refrigerator for up 4 days.

Hand-Whipped Cream Ingredients
- 1 cup heavy cream
- 2 heaping tablespoons confectioner’s sugar
- 1/2 teaspoon vanilla or vanilla bean extract
Pour the cold heavy cream into a large bowl. Stir in the vanilla bean and confectioner’s sugar until dissolved. Use a large balloon whisk to whip the cream until soft peaks form. Do not over whip. Serve immediately or keep in the refrigerator until ready to serve for no longer than 3 hours.

Vanilla Bean Orange Scented Shortbread Cookies
Cooking Note: It is best to bake cookies that are approximately the same size to ensure even cooking. If you do not have vanilla bean paste or fresh vanilla bean, you can certainly substitute vanilla extract.
Makes approximately 18 cookies
Ingredients
- 6 ounces unsalted butter, room temperature
- 1/2 cup sugar, plus 2 tablespoons for sprinkling
- 1/2 teaspoon vanilla bean paste
- 1/2 teaspoon finely grated orange zest
- 1 3/4 cups all purpose flour
- pinch of salt
In a large bowl cream (either by hand or with an electric mixer) the butter and sugar until combined. Add in the vanilla bean paste and orange zest. Sift the flour and salt over the butter and sugar mixture. Gently stir in flour into the dough until just combined. Place the dough on a lightly floured work surface and gently pat into a ball. Chill for 30 minutes to 1 hour in the refrigerator.
Preheat the oven to 350 degrees F. On the lightly floured work surface, roll the dough to 1/2 inch thick. Use a cookie cutter to press out cookie shapes and place on to an ungreased cookie sheet. Sprinkle the cookies with reserved sugar. Refrigerate the cookies on the sheet pan for approximately 10 minutes before baking. Bake the cookies for 15-17 minutes, depending on the size of the cookies, or until the edges are light golden brown. Let the cookies cool on the cookie sheet for 1 minutes, then transfer to a wire rack to cook completely. These cookies will keep in an airtight container for up to 3 days.


Sunday, September 13, 2009
Back to School
Chocolate Chip and Cinnamon Granola Bars

Makes 12
Ingredients
- 2 cups old fashion oats
- 1 cup instant oats
- 2 tablespoons unsalted butter, melted
- 1/3 cup packed brown sugar
- 1/2 cup honey
- 1/4 teaspoon salt
- 1/2 teaspoon vanilla extract
- 1 teaspoon cinnamon
- 1 egg white
- 1/4 cup all purpose flour
- 2/3 cup semi sweet chocolate chips
- canola oil for greasing the pan

Preheat the oven to 350 degrees F. Spread the old fashion and quick cooking oats on a baking sheet and toast until light golden brown, about 10 minutes. Set aside and let cool. Meanwhile, grease a 9 by 9 inch baking pan with canola oil.
In a small mixing bowl combine the melted butter and brown sugar and mix until smooth. Add the honey, vanilla and salt until combined. Set aside.
When the oats are completely cool, combine the oats and cinnamon in a large mixing bowl. Add the honey mixture and gently combine with the oats. Stir in the egg white until combined, and then stir in the flour. Finally, stir in the chocolate chips. Pour the batter into the greased baking pan and press down with the back of a spoon. Bake the bars for 25-30 minutes, or until the top is golden brown. Transfer the pan to a wire rack to cool completely, about 3 hours. Cut into approximately 1 1/2 by 4 1/2 inch bars and store in an airtight container or wrap individually with parchment paper. These will keep in an airtight container for 3-4 days.
 Unbaked
 Baked
Baked

Makes 12
Ingredients
- 2 cups old fashion oats
- 1 cup instant oats
- 2 tablespoons unsalted butter, melted
- 1/3 cup packed brown sugar
- 1/2 cup honey
- 1/4 teaspoon salt
- 1/2 teaspoon vanilla extract
- 1 teaspoon cinnamon
- 1 egg white
- 1/4 cup all purpose flour
- 2/3 cup semi sweet chocolate chips
- canola oil for greasing the pan

Preheat the oven to 350 degrees F. Spread the old fashion and quick cooking oats on a baking sheet and toast until light golden brown, about 10 minutes. Set aside and let cool. Meanwhile, grease a 9 by 9 inch baking pan with canola oil.
In a small mixing bowl combine the melted butter and brown sugar and mix until smooth. Add the honey, vanilla and salt until combined. Set aside.
When the oats are completely cool, combine the oats and cinnamon in a large mixing bowl. Add the honey mixture and gently combine with the oats. Stir in the egg white until combined, and then stir in the flour. Finally, stir in the chocolate chips. Pour the batter into the greased baking pan and press down with the back of a spoon. Bake the bars for 25-30 minutes, or until the top is golden brown. Transfer the pan to a wire rack to cool completely, about 3 hours. Cut into approximately 1 1/2 by 4 1/2 inch bars and store in an airtight container or wrap individually with parchment paper. These will keep in an airtight container for 3-4 days.
 Unbaked
 Baked
BakedMonday, August 10, 2009
Cheesecake Brownies

There is little that needs to be said about these brownies, except that they are delicious and very easy to make. Enjoy.
Cheesecake Brownies
Makes approximately 24 brownies
Ingredients
Brownie Batter
- 1 stick unsalted butter, chopped
- 8 ounces bittersweet chocolate (62-68%), chopped
- 1 1/2 cup sugar
- 4 large eggs
- 1 teaspoon vanilla extract
- 3/4 cup flour
- 1/2 teaspoon salt
Cheesecake Filling
- 1 eight ounce package cream cheese, at room temperature
- 1/3 cup sugar
- 1 large egg
- 1 teaspoons vanilla extract
- canola oil, for greasing the pan

Preheat the oven to 350 degrees F. Grease a 13 by 9 inch baking dish.
Melt the chopped chocolate and the butter together in a double boiler or in the microwave. Be careful not to over heat and burn the chocolate. Set aside to cool.
Meanwhile, to make the cheesecake filling, place the soft cream cheese in a bowl fitted for an electric mixer, or use an electric hand mixer, and cream the cream cheese with 1/3 cup of sugar. Add the egg and vanilla extract and mix on medium speed until smooth and creamy, about 1 minute. Set the cheesecake mixture aside.
To finish making the chocolate brownie batter, add the sugar to the cooled chocolate and butter mixture and stir until combined. Add the 4 eggs, one at a time mixing until combined after each addition. Add in the vanilla extract. Sift the flour and salt over the chocolate mixture and gently fold the dry ingredients into the wet ingredients.
Pour the chocolate brownie batter into the greased pan. Drizzle the cheesecake batter over the chocolate batter. Use a knife to gently swirl the cheesecake batter into the chocolate brownie batter. Do not over mix the two batters or it will look like a real mess. Bake for about 40 minutes. The cheesecake part of the brownies should turn light golden brown and will slightly puff up. Let the brownies cool completely in the pan. Cut into desired sizes and serve. These brownies can be made a day ahead of time, but cut the brownies the day you plan to serve them.
Subscribe to:
Posts (Atom)